Posted in Dessert

Basque Burnt Cheesecake (Cheesecake ala Basque)

I have seen lots of feeds about this cheesecake on my social media, this cake looks rustic and “interesting”. One thing caught my mind instantly is : I have got to try this.This kind of cheesecake does not have a crust, similar to Japanese style Cheesecake.

I found this recipe in my Facebook feeds, the recipe is easy to follow and looks like a foolproof recipe. So I decided to execute this one for my husband’s birthday.

Ingredients:

  • 678 grams cream cheese; room temperature
  • 226 grams mascarpone cheese; room temperature
  • 320 grams granulated sugars
  • 6 whole eggs
  • 1 egg yolk
  • 3/4 tsp salt
  • 415 milliliters heavy cream
  • 1 1/2 tsp vanilla extracts
  • 52 grams all purpose flour

Directions:

  1. Preheat oven to 400 Fahreinheit
  2. Butter the bottom of springform pan cheesecake with butter. Crumble the parchment paper, line the springform pan cheesecake with parchment paper. Let it overhang the pan. Double the parchment paper on the pan
  3. Whip the cream cheese with electric mixer on low speed until well incorporated
  4. Add mascarpone cheese to the cream cheese mixture, whisk it on medium speed
  5. Add sugar gradually. Whisk the mixture with medium speed
  6. Scrape the side of bowl, make sure all it’s blended well
  7. Add whole eggs, one at a time
  8. Additionally egg yolk, continue mixing
  9. Add heavy cream
  10. Add vanilla extract
  11. Add salt to flour, sift the flour to the mixture
  12. Pour the mixture to the pan. Bake for 60 minutes. I am using gas oven, taking about 75 minutes. Check your oven. If you see the top of the cheesecake is already dark brown you can turn off the oven. Take it out from oven.The middle of the cake is still slightly jiggly. Put it the cooling rack. When it’s slightly cool, you can unlock the pan. Peel off the parchment paper when it’s completely cool. I only peeled the parchment on the side, I put the cheesecake in the fridge, I prefer to eat after it’s chilled

I love this cheesecake, has a lighter texture that New York style cheesecake, closer to Japanese Cheesecake. It has the right sweetness for me. I made this for my husband’s birthday. My husband and daughter love this one. Yeay, I nailed !!!

Give it a try, you might like it.

Posted in Dessert, vegetarian

Putu Ayu (Indonesian Steamed Pandan Cake with Grated Coconut)


DSC_7603


Recipe in English way down below, guys !


Kue putu ayu ini biasanya saya beli di abang-abang yang jualan jajanan tradisional seperti putu mayang,klepon dan teman-temannya. Mereka biasanya jual di gerobak yang didorong. Dan biasanya mereka jualannya sore hari dan saya biasanya belinya pas pulang kantor. Alhasil dengan perut lapar bikin saya agak kalap beli jajanannya.

Ini pertama kalinya saya buat putu ayu ini dan berhasil dengan sukses, yeay !!! Cetakannya saya beli pas mudik ke Indonesia, Kombinasi asin dari parutan kelapa dan manisnya kue putu pas banget di lidah kami. Saya ambil resep dari link ini.

Bikin yuk !

Bahan-bahan:

  • 250 gr tepung terigu
  • 225 gr gula pasir
  • 4 butir telur
  • Pewarna makanan warna hijau /pandan secukupnya
  • 150 ml santan+ 50 ml air (saya pakai yg instan, karena di sini gak jual yang santan segar) yang dicampur dengan air karena saya pake santan kara.  Jika menggunakan santan segar, santan dimasak terlebih dahulu sedangkan jika menggunaka santan instan tidak perlu.
  • 1/2 sdm emulsifier/ovalet
  • 50-75 gr kelapa parut
  • garam secukupnya


Cara membuat :

  1. Kukus kelapa parut yang sudah diberi sedikit garam selama 10-15 menit di panci yang sudah dipanaskan sebelumnya. Sisihkan kelapa parut yang sudah dikukus.
  2. Masukkan gula, telur dan ovalet/emulsifier, kocok dengan mikser elektrik sampai berwarna putih dan pucat.
  3. Ayak tepung terigu sebelum dimasukkan ke adonan telur dan gula yang sudah dikocok, masukkan secara bertahap. Terus dikocok dengan mikser sampai merata.
  4. Tambahkan santan sedikit demi sedikit, kocok sampai merata. Tambahkan pewarna makanan secukupnya
  5. Olesi cetakan dengan minyak sampai merata.
  6. Taruh parutan kelapa yang sudah dikukus di cetakan kue secukupnya sambil agak ditekan, tuang adonan kue putu 3/4 porsi ke cetakan
  7. Kukus selama 5-10 menit, dinginkan sebentar dan kue bisa dilepas dari cetakkannya.


DSC_7610


Ingredients :


  • 250 gr all purpose flour
  • 225 gr sugar
  • 4 large eggs
  • 150 ml coconut milk
  • 50 ml water
  • 1/2 – 1 tsp Green food coloring/pandan essence, depending how dark you want the green color you want to be for the steamed cake
  • 1/2 tbsp cake emulsifier
  • 50- 75 gr steamed grated  coconut
  • a pinch of salt


Methods :

  1. Steam the grated coconut with a pinch of salt for 10 – 15 minutes, set aside
  2. Mix sugar, cake emulsifier, eggs using electric mixer until the batter looks pale (looking whitish batter), the batter will be thick and pale.
  3. Sift flour before you put into the batter, mix it well until well combined
  4. Add coconut milk in few batches, mix it well.
  5. Add green food coloring, mix it until well combined
  6. Grease the silicone mould with oil, put steamed grated coconut on the bottom of mini silicone mould, Press it  with your fingers.
  7. Pour the batter (3/4 portion) to the mould, steam for 10 minutes. Cool them on the cool rack then invert them. You can also steam the cake without grated coconut altogether, just serve them with grated coconut. Combination of the steamed cake with grated coconut will be a perfect pair


DSC_7616


Posted in Dessert

Cookies and Cream (Cheese) Parfait


DSC_9170

This dessert looks elegant and yummy (trust me ! I’ve tried it). It’s so easy and simple to make, this is one of the foolproof recipe that can’t go wrong. My family loves it. My daughter could not tell that the bottom layer was cream cheese (mixed with cocoa powder). You won’t make any mistake when putting them altogether. Having fun is the key for this. You can either layer the cookies on the bottom of the glass or mix the cookies with the cream. There’s no any order for making this dessert enjoyable.

Go ahead make this parfait and indulge yourself with this treat. Invite your friends to enjoy this together. Impress them by how easy and yummy treats to dig in. Let’s get started !

Ingredients : (makes 4 – 8 serving)

For cheesecake layer

  • 16 ounces = 452 gr cream cheese, room temperature
  • 1/2 cup = 115 gr sugar
  • 1/4 cup = 30 gr cocoa


For whipped cream layer

  • 1 cup = 250 ml cold heavy cream/whipping cream
  • 1 1/2 tbsp cocoa
  • 3 tbsp powdered sugar


For Cookies layer

  • 15 oreo cookies, crushed. I prefer using fine ground for the layer and using the crushed cookies on top of the cream


Methods:

For Cheesecake layer

  • Beat cream cheese, sugar and cocoa with electric mixer until smooth, set aside.


For Whipped cream layer

  • Whip heavy cream/whipping cream until it gets thicken, add cocoa and sugar continue to whip until stiff peak forms


To assembly the parfait;

  1. Pipe or spoon cheesecake mixture on the bottom of the glass
  2. Sprinkle with oreo cookies
  3. Pipe or spoon whipped cream on top of the cookies layer
  4. Sprinkle with oreo cookies , if needed


DSC_9167


Posted in Dessert

Moist and Indulgent Chocolate Bundt Cake

DSC_7933

This above cake was baked long time ago in 2019, a day before my birthday. I was planning to bake chocolate cake for my own birthday, something that I can indulge without feeling guilty (guilty from buying dessert that I don’t know what it tastes like not from the calories !). A cake that moist

This recipe looks similar from what I am looking for but unfortunately has bad reviews. Readers said the cake is disappointing such as dry, not sweet enough. To solve this I add extra sour cream and dark chocolate chips also reducing baking time I was  so glad that the cake turned out to be moist and rich from chocolate chips. Yeay… I made it


I did not use the glaze as I just want to have simple chocolate cake. I find that this cake tastes rich from the chocolate chips so I thought adding powdered sugar just for aesthetically purpose.

I use mini bundt cake pans so it will be easy to share with companions. Let’s get started !


Ingredients :

  • 2 sticks = 226 gr unsalted butter at room temperature
  • 2 1/4 cups = 270 gr all purpose flour
  • 3/4 cup = 63 gr unsweetened cocoa powder
  • 1 tsp baking soda
  • 1 tsp salt
  • 1/2 cup = 114 ml milk
  • 1/2 cup + 3 tbsp =  159 ml sour cream
  • 1 1/2 cups = 319 sugar
  • 4 large eggs
  • 1 tsp vanilla extract
  • 100 gr dark/milk chocolate chips
  • butter to grease the cake pan


Methods :

  1. Pre heat oven to 325 degrees fahrenheit, butter mini bundt cake. In a large bowl, whisk together flour, cocoa,baking soda and salt.
  2. Mix milk and sour cream in a cup
  3. Using an electric mixer; beat butter and sugar until pale and fluffy (around 3- 5 minutes, depends on the power of your mixer)
  4. Add eggs; 1 at the time. Beating well after each addition. Add vanilla.
  5. Reduce speed to low; add dry mixture in 2 batches; alternate with milk mixture. Beat until well combined.
  6. Transfer the batter to the mini bundt cake pans to 3/4, smooth the top with spatula. Bake until when you insert the tooth pick comes out clean; about 40-45 minutes. Transfer the cake pans to a wire rack to cool completely.
  7. Dust with powdered sugar if you desire
  8. Enjoy !!!


Posted in Dessert, gluten free, vegetarian

Indonesian style Steamed Sweet Potato Cake ( Talam ubi)

DSC_8051


I have some sweet potatoes from making bubur candil and I am craving for something sweet but not too sweet. I was browsing for some desserts that uses sweet potatcame across to this recipe. This dessert is similar to Indonesian Steamed sweet potato cake (AKA:  Talam Ubi); the difference is the steamed cake topped with coconut milk instead of coated with grated coconut. This dessert has the right sweetness and gluten free !!! That’s great since  I am trying to reduce my gluten consumption .

The texture is soft and a bit chewy, the saltiness from grated coconut combined with the softness and sweetness of the steamed cake make it a quite addictive snack for me. Hope you all will try to make it and like this delicate snack.


Ingredients:

  • 2 medium sweet potatoes (weight around 300 gr)
  • 170 gr sugar
  • 100 ml water
  • 150 gr tapioca flour
  • 250 ml coconut milk
  • salt
  • 125 gr grated coconut; if using frozen thaw first
  • a pinch of salt


Methods

  1. Boil water with the sugar until the sugar dissolve.Set aside
  2. Peel the skin of sweet potatoes, dice them and steam in the steamer for about 30 minutes.
  3. Using blender, blend sweet potatoes, sugar syrup, coconut milk, tapioca and salt until blended finely
  4. Pour batter into the 8 x 8 inch greased pan or the loaf pan lined with plastic wrap.
  5. Steam for 40 minutes, let it cool for 2-3 hours before slicing into pieces
  6. Steam grated coconut with a pinch of salt for 5-10 minutes.
  7. Coat the sweet potatoes cake with grated coconut and serve immediately


Posted in Breakfast, Dessert

Chia Seed Pudding (3 ways)


I always struggle to eat and prepare healthy breakfast that does not require a lot time of preparation. I prefer to have plant based or  natural ingredients and less processed for my breakfast but also tastes good. I usually go for smoothies or granola and fruit parfaits but I want some varieties.

I came up with these kind of variations of chia pudding after consuming (about 3 months) chia seed soaked in my water jug overnight, get tired of just a plain chia seed I started mixing here and there with other stuffs

  1. Chia Seed with blueberry and walnut

Ingredients:

  • 200 ml unsweetened almond milk/whole milk ( I can’t stand with whole milk so I use almond milk)
  • 1 tbsp peanut butter
  • 2 tbsp maple syrup or 1 tbsp honey
  • 1 – 2  tbsp chia seed (depends how much you want the consistency of the pudding)
  • Blueberry for topping (optional)
  • Walnut ; chopped for topping (optional)

Directions:

  1. Combine peanut butter and almond milk in measuring cup, stir until mixed well
  2. Stir in chia seed, pour into mason jar/cup let it sit overnight in the fridge.
  3. When it’s ready to consume . topped with blueberry and walnut


DSC_8916


2. Cacao Chia seed pudding with apple and walnuts

Ingredients:

  • 100 ml coconut milk
  • 100 ml water
  • 2 tbsp chia seed
  • 1/2 tsp cocoa powder
  • 2 tbsp maple syrup
  • 50 gr diced apple
  • 1 tbsp maple syrup
  • walnuts


Directions:

  1. Mix coconut milk, water, maple syrup, chia seed and cacao powder in a measuring cup. Pour in a cup or mason jar let it sit overnight in the fridge.
  2. When it’s ready to consume, topped with diced apple mixed with maple syrup and walnut


DSC_8862


3, Coconut Milk Chia Seed Pudding with diced apple and walnuts

Ingredients:

  • 100   ml coconut milk
  • 100 ml water
  • 2 tbsp chia seed
  • 2 tbsp maple syrup
  • 50 gr diced apple
  • 1 tbsp maple syrup
  • walnuts
  • dash of cinnamon (optional)


Directions:

  1. Mix coconut milk, water chia seed, maple syrup in a measuring cup. Pour in the cup or mason jar, let it sit overnight.
  2. When ready to consume, topped with diced apple mixed with maple syrup and sprinkle with walnuts , dash of cinnamon powder (if you like)


DSC_8866


Posted in Dessert

Best Zucchini Bread

DSC_5814

One time, we (me, my husband and my daughter) were invited to my husband’s ex-co-worker. They served us zucchini bread, and it tastes so good. My husband and I were curious about the recipe and asked the wife’s host but she did not tell us. After coming back to LA, I was browsing for zucchini bread on the internet. And like it or not you will find so many recipes, it was overwhelming. Sometimes in life, we need to try stuffs to know if they work or not. I try this recipe and I like it. I modified a little bit to my liking.

Photo above was using the original, the cake was denser and more moist than the one that I usually bake. I prefer the modified version as I think it’s lighter. Feel free to try both versions so you can tell which one you prefer.

Let’s get started;

Ingredients:

  • 1 1/2 cups grated zucchini (use the big hole grater); I am using 2 cups grated zucchini, line the big plate with double layer paper towel to absorb the liquid from zucchini. Scatter evenly the grated zucchini on the paper towel. Let it sit for 4 hours. No need to squeeze the liquid on the paper towel from the grated zucchini because we need it so the cake won’t be dry.
  • 1 cup sugar
  • 1/4 cup packed light brown sugar
  • 1/3 cup vegetable oil
  • 1/2 cup applesauce; I am using 1 mashed very very ripe banana
  • 2 large eggs
  • 1 tsp vanilla extract
  • 1 1/2 cups all purpose flour
  • 1/2 tsp baking powder
  • 1/2 tsp baking soda
  • 1/2 tsp salt
  • 1/2 tsp ground cinnamon; I am using 1 tsp ground cinnamon

Directions:

  1. Preheat oven to 350 degrees Fahrenheit. Line the baking loaf  (9 x 5 inch) with parchment paper
  2. In a large bowl, add the grated zucchini, brown sugar, granulated sugar, mashed banana, oil, eggs and vanilla. Combine until it’s mixed well with wooden spoon.
  3. Add the flour, baking soda, baking powder, salt and ground cinnamon. Stir just until it’s well incorporated. Do not over mix
  4. Pour the batter into the baking loaf, bake for 50-55 minutes.
  5. Let it cool completely on the cool rack

This cake tastes better after kept in a fridge for a day.

Posted in Dessert, Snack

Baked Donuts with Strawberry Filling


DSC_6314.1


I have been wanting to make these donuts since I saw the video on Youtube but I am not so sure if my daughter or my husband will like it since it is not chocolate dessert. Well, I made them anyway, hoping they will like them. And, surprisingly they like them.

When these donuts are fresh from the oven, they taste soft and light. The next day, donuts were slightly dense even I kept them in the tight container. The strawberry filling is optional but in my opinion, it’s giving a kick to the donuts. They won’t taste too dense if they have strawberry filling

Let’s make these donuts

Ingredients :

  • 1 cup all-purpose flour (128 grams)
  • 1/4 cup of sugar (58 grams)
  • 1 packet of  instant yeast (2 1/4 tsp)
  • 1/4 tsp salt
  • 2/3 cup of warm milk (160 ml)
  • 3 tbsp of melted unsalted butter (43 grams)
  • 2 eggs yolk
  • 1/2 tsp vanilla essence
  • 1 1/2 cups of flour (192 grams)
  • 1/3 cup of strawberry jam (for filling) equals 65 grams
  • 1 tbsp melted butter (for brushing donuts)
  • 1/3 cup granulated sugar (for coating the donuts)


Directions:

  1. In a medium bowl;  mix 1 cup of flour, 1/4 cup of sugar, yeast, salt. Mix them well.
  2. Add warm milk, 3tbsp melted butter, eggs yolk, and vanilla essence to dry ingredients. Whisk them until well incorporated. Cover with cling wrap (plastic wrap), let it rest for 10 minutes (room temperature) or until bubbles form on the surface
  3. Add 1 1/2 cups of flour, mix it until the dough does not stick on the bowl. Knead for 5 minutes until the dough elastic (soft and does not stick to the bowl). Add the flour when kneading if needed. Let it rise to double size at room temperature for 1 1/2 hours.
  4. Turn the dough to a floured surface, dust the top of dough with flour. Roll it to 1/2 inch thick, use the round cookie cutter. Make 12-14 donuts
  5. Transfer the dough to the baking pan lined with parchment paper. Cover with a towel and let it rise at room temperature for 45 minutes.
  6. Bake donuts at 375 degrees Fahrenheit at preheated oven until lightly golden.
  7. Brush donuts with melted butter as soon as donuts come out of the oven. Roll with granulated sugar.
  8. Use a medium knife to slit the side of donuts or use the big straw to make a hole on the side of donuts
  9. Using a pastry bag to pipe strawberry jam into the (hole) donuts


Posted in Dessert, Indonesian Food

Mini Martabak Manis (Indonesian style Pancake)


DSC_3795

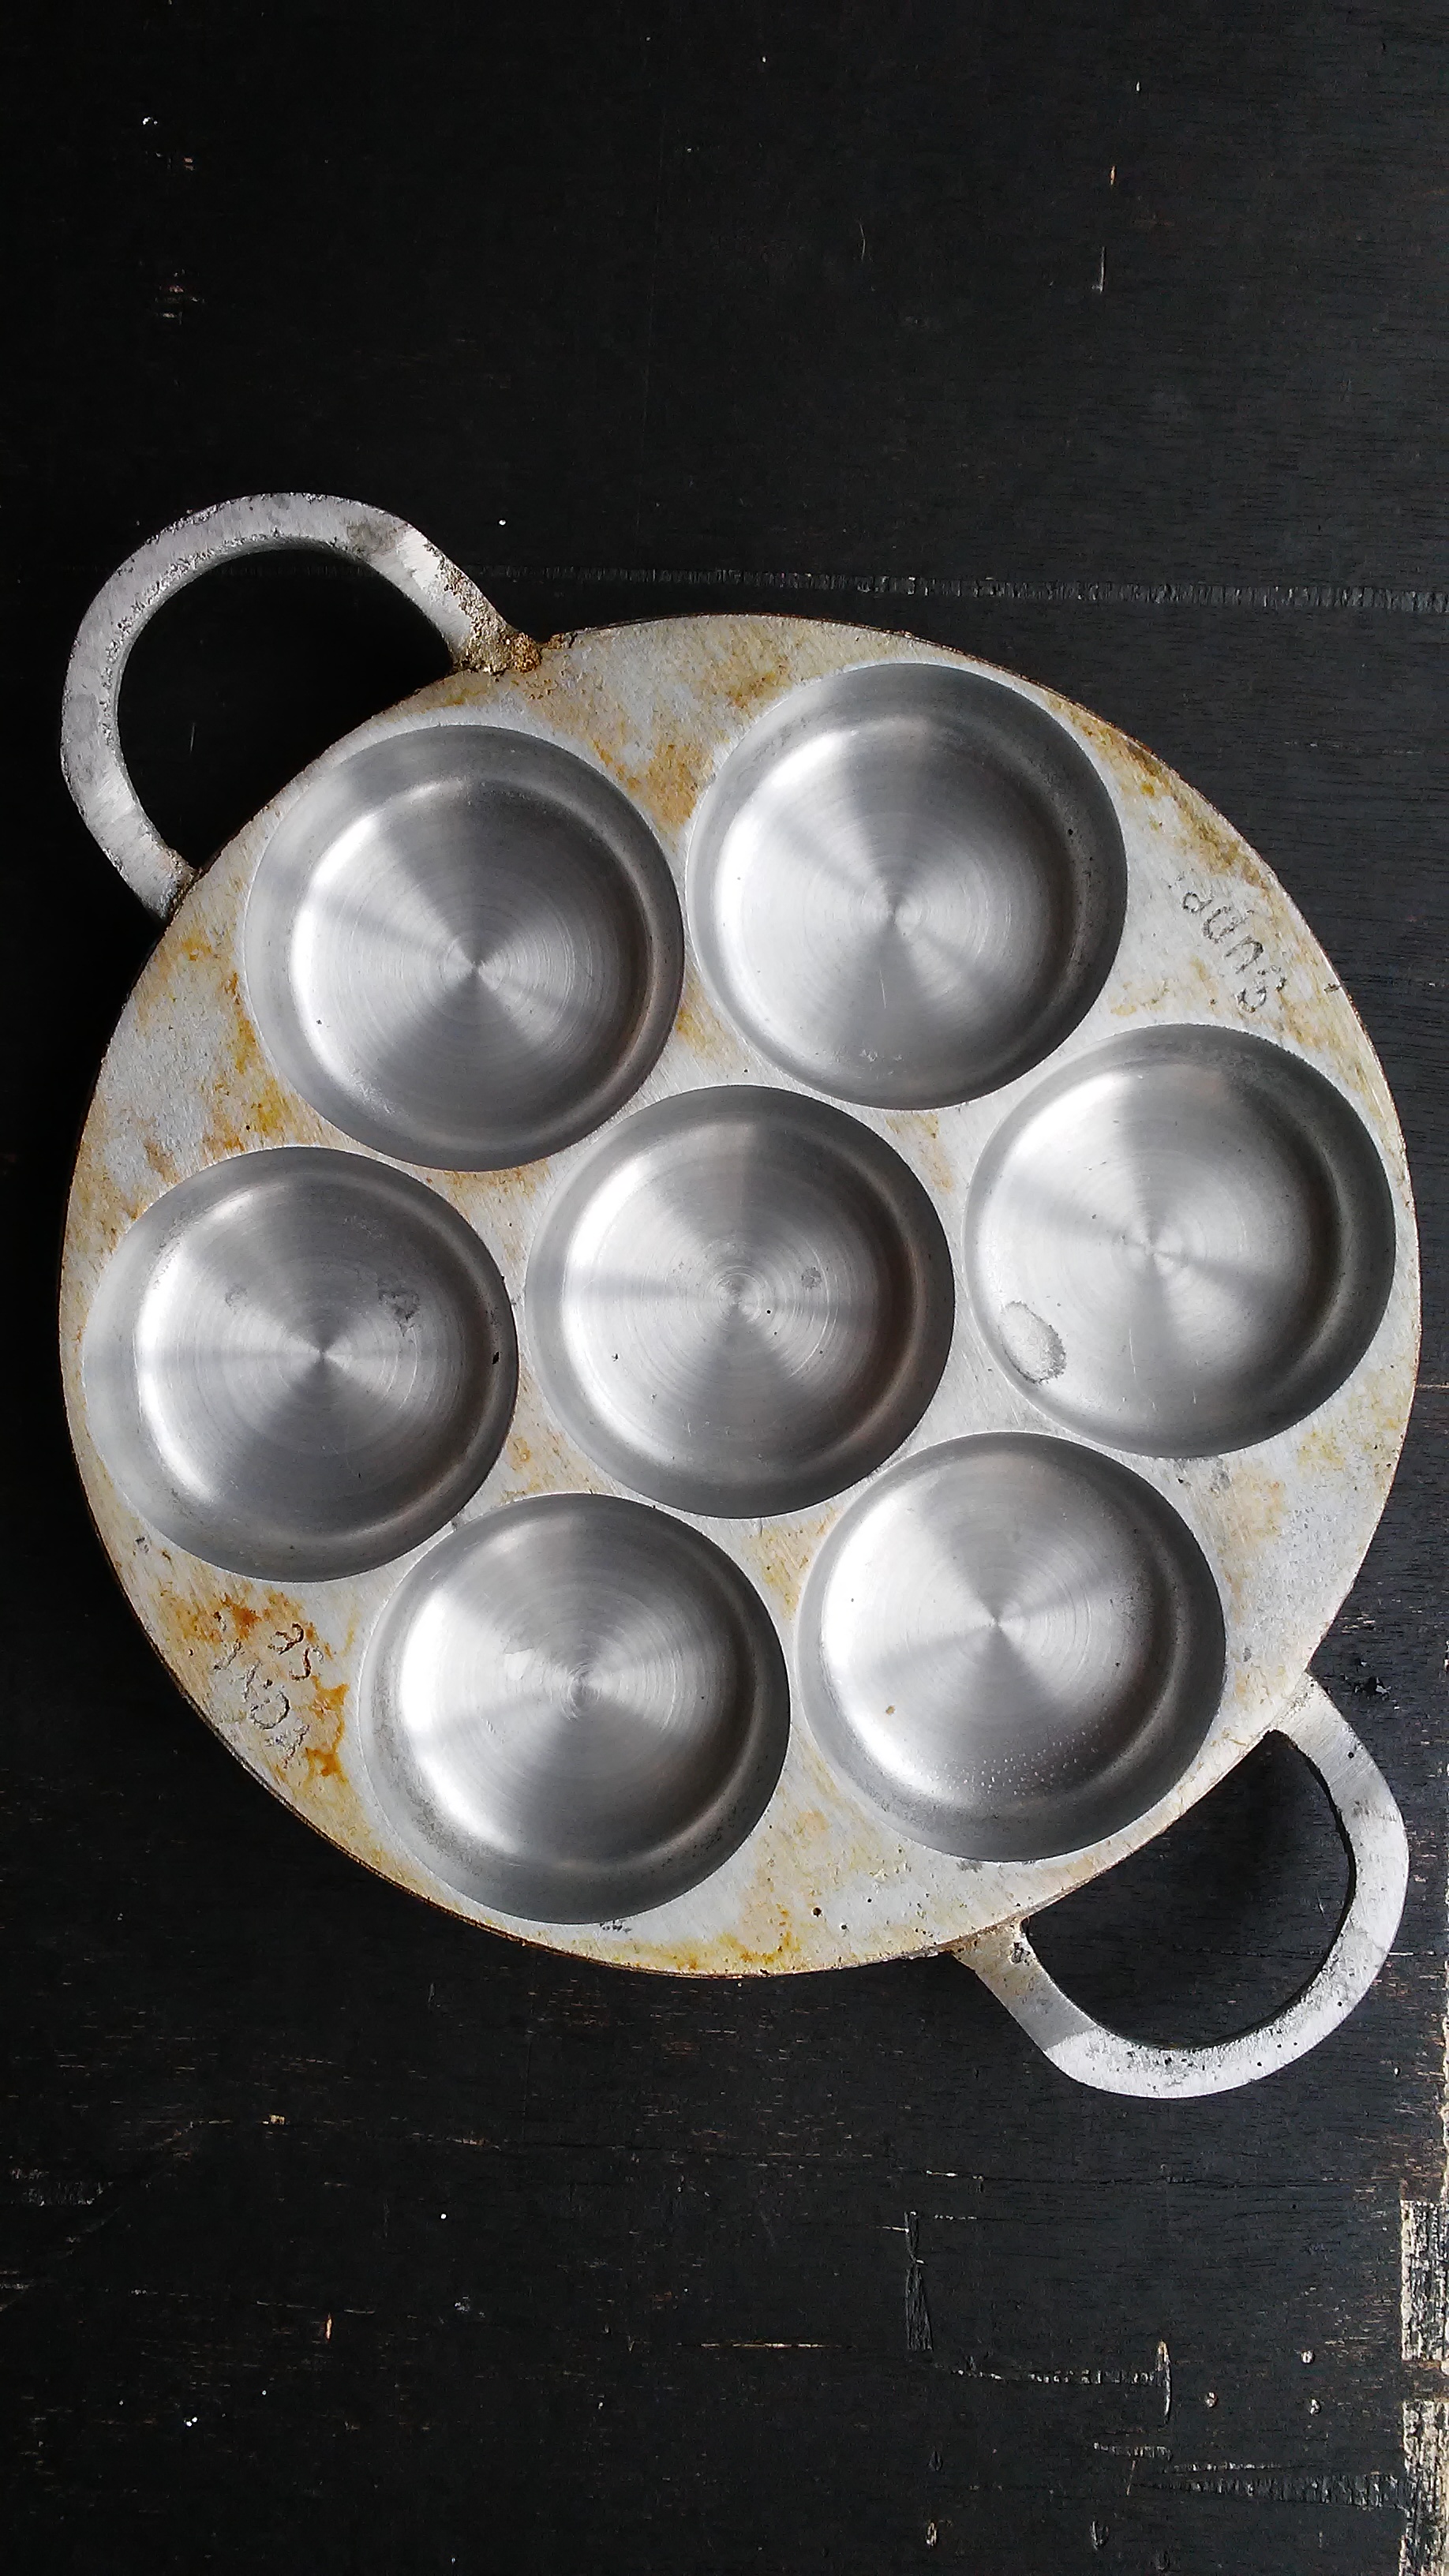
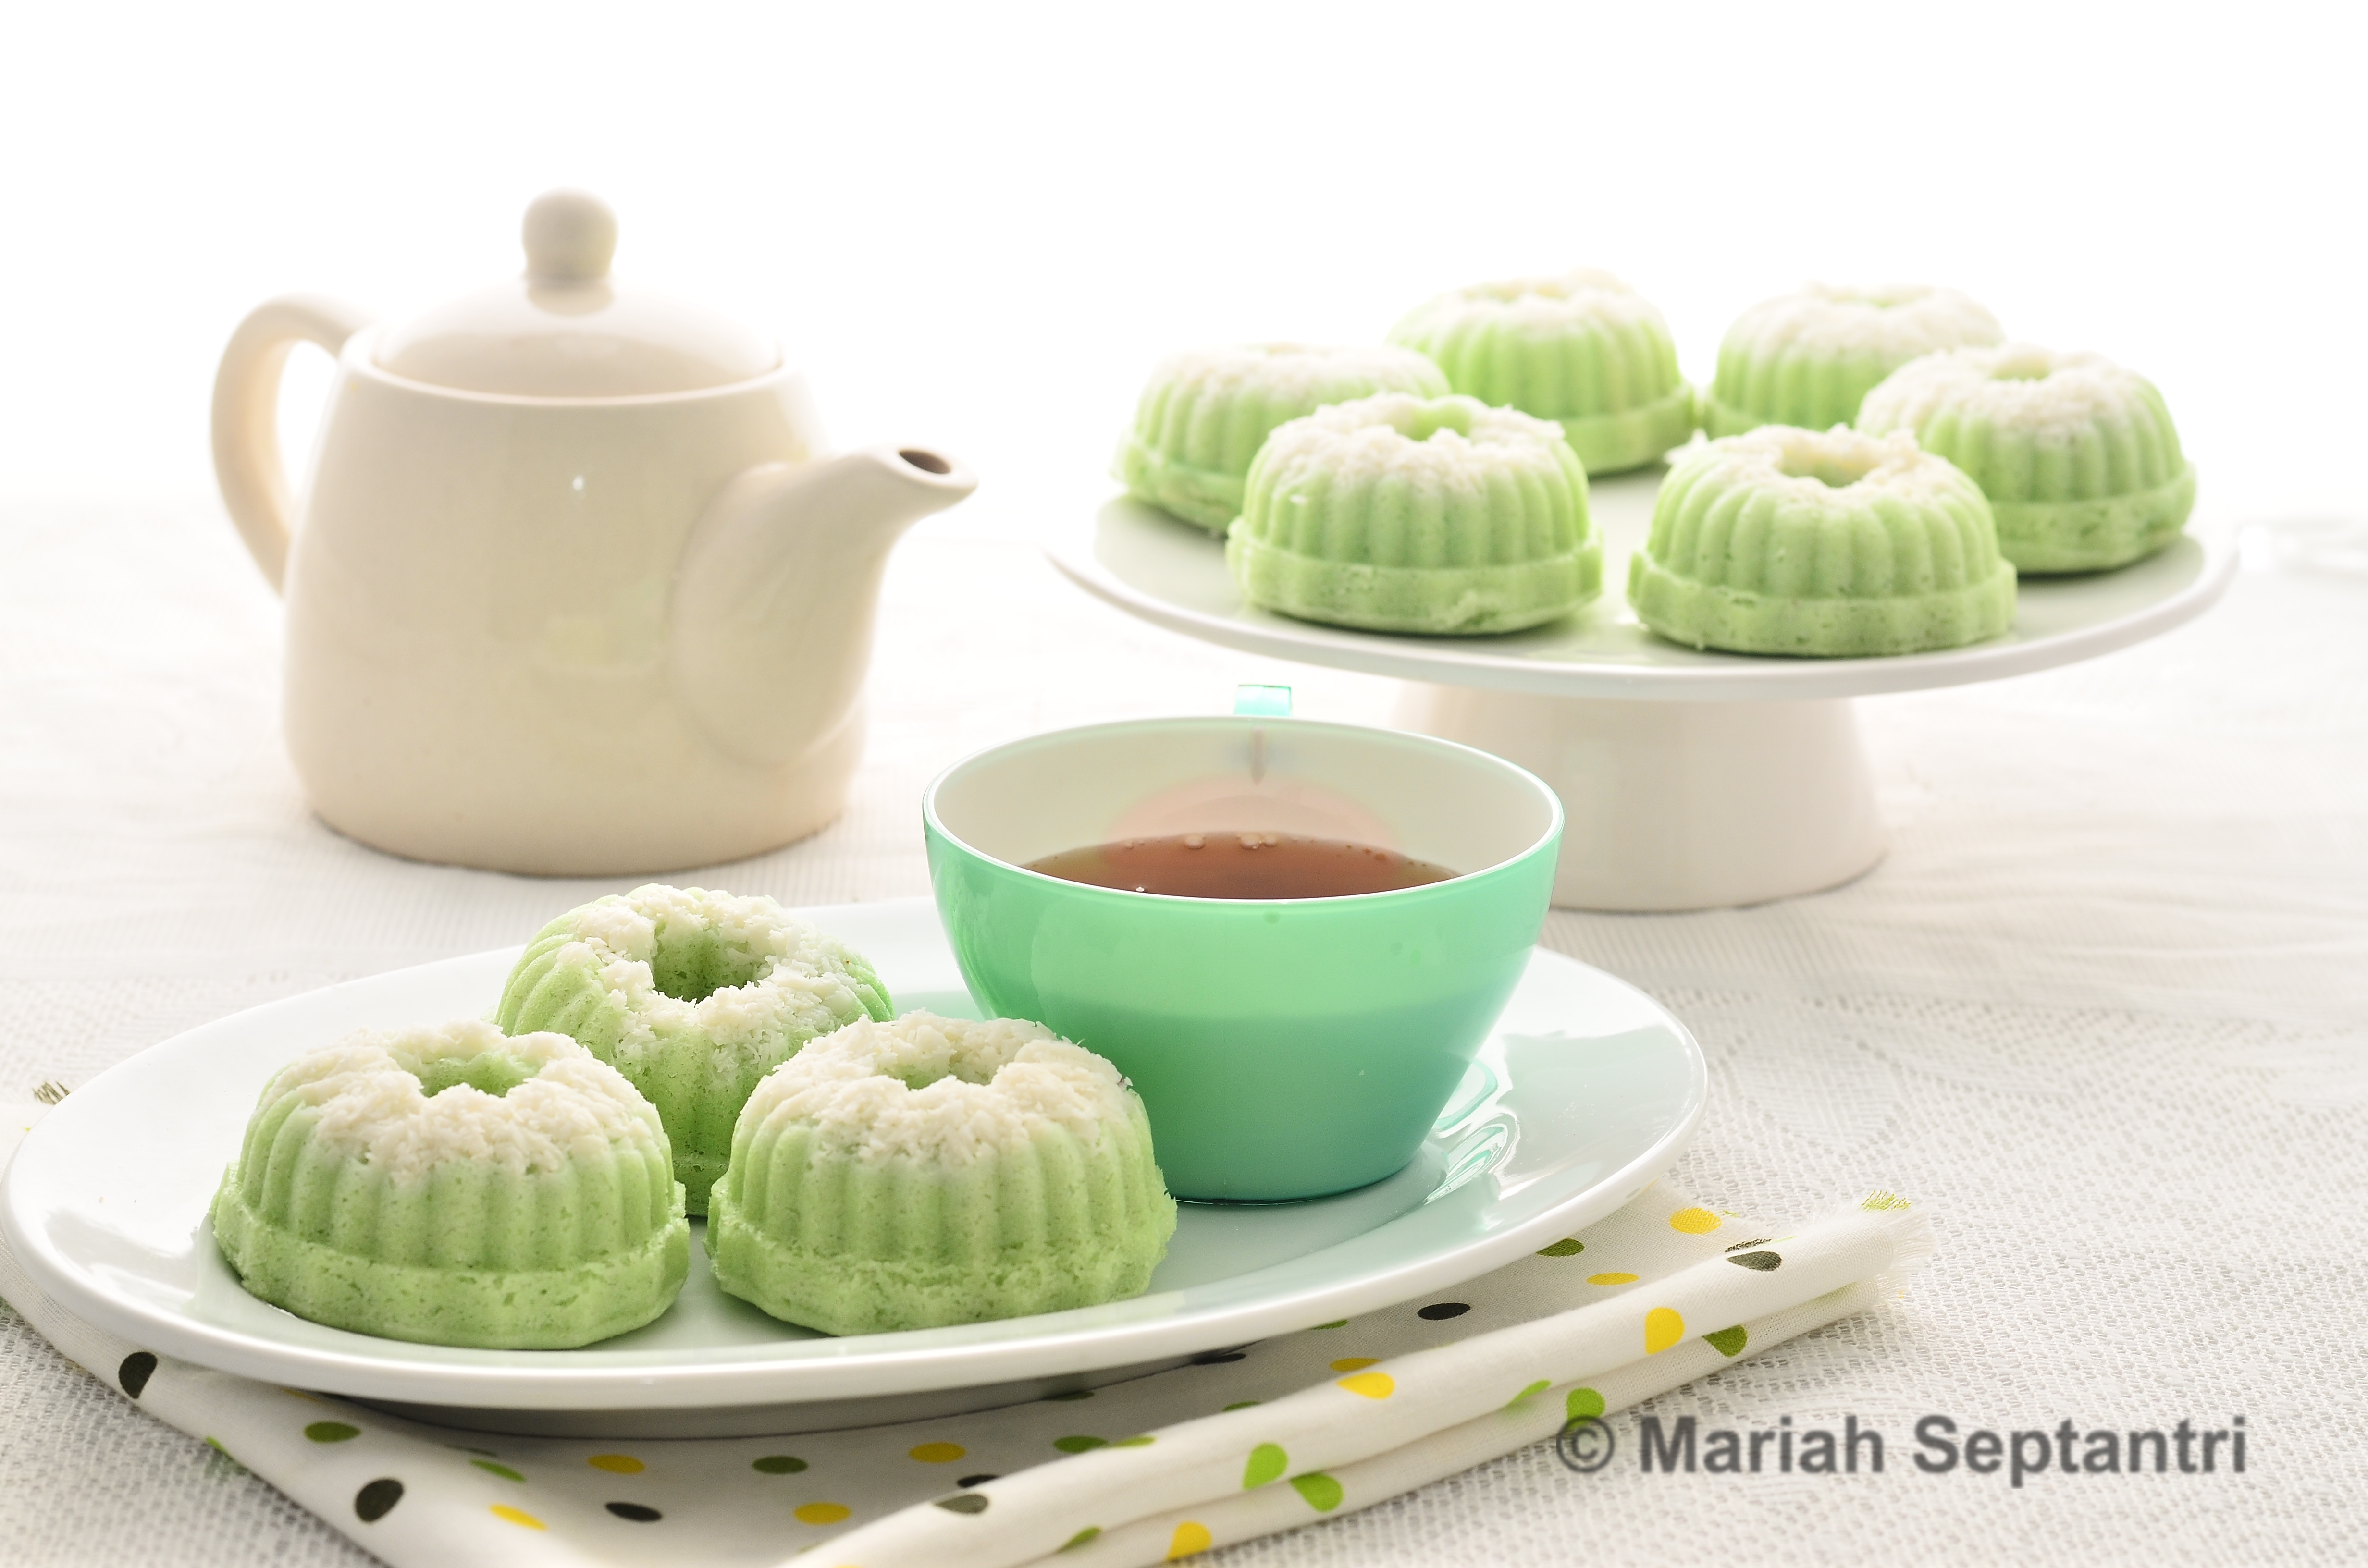
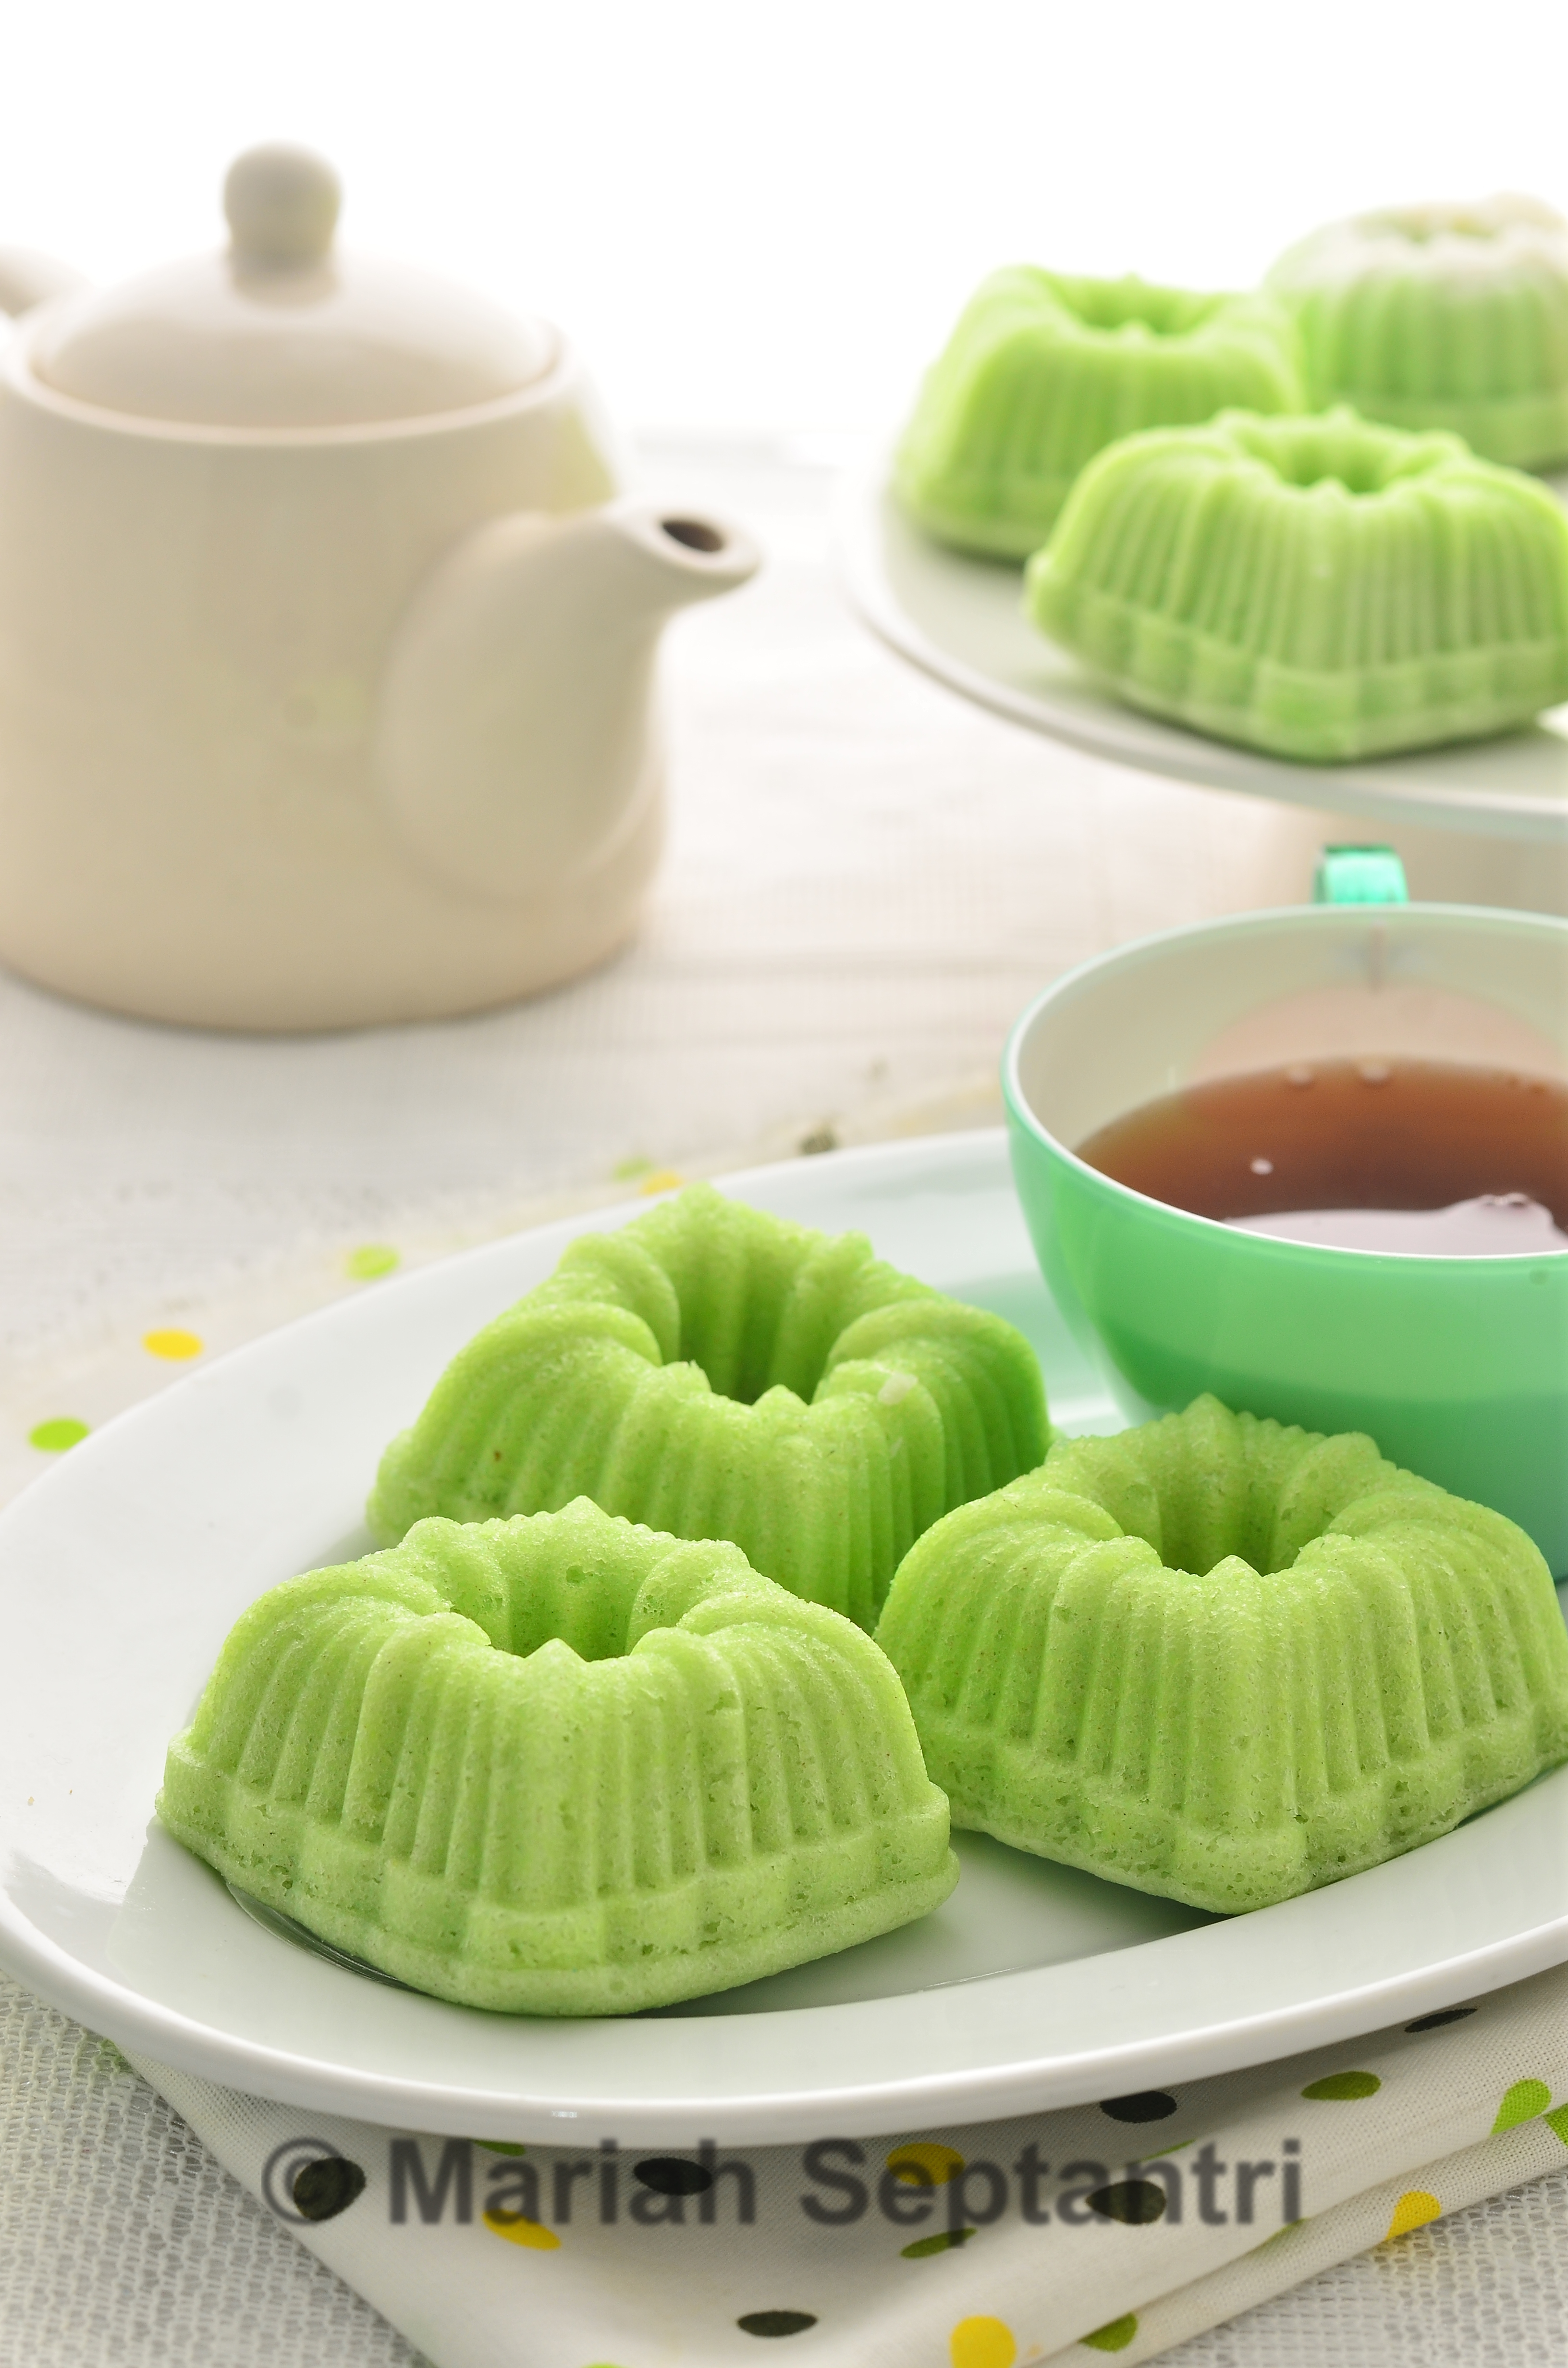
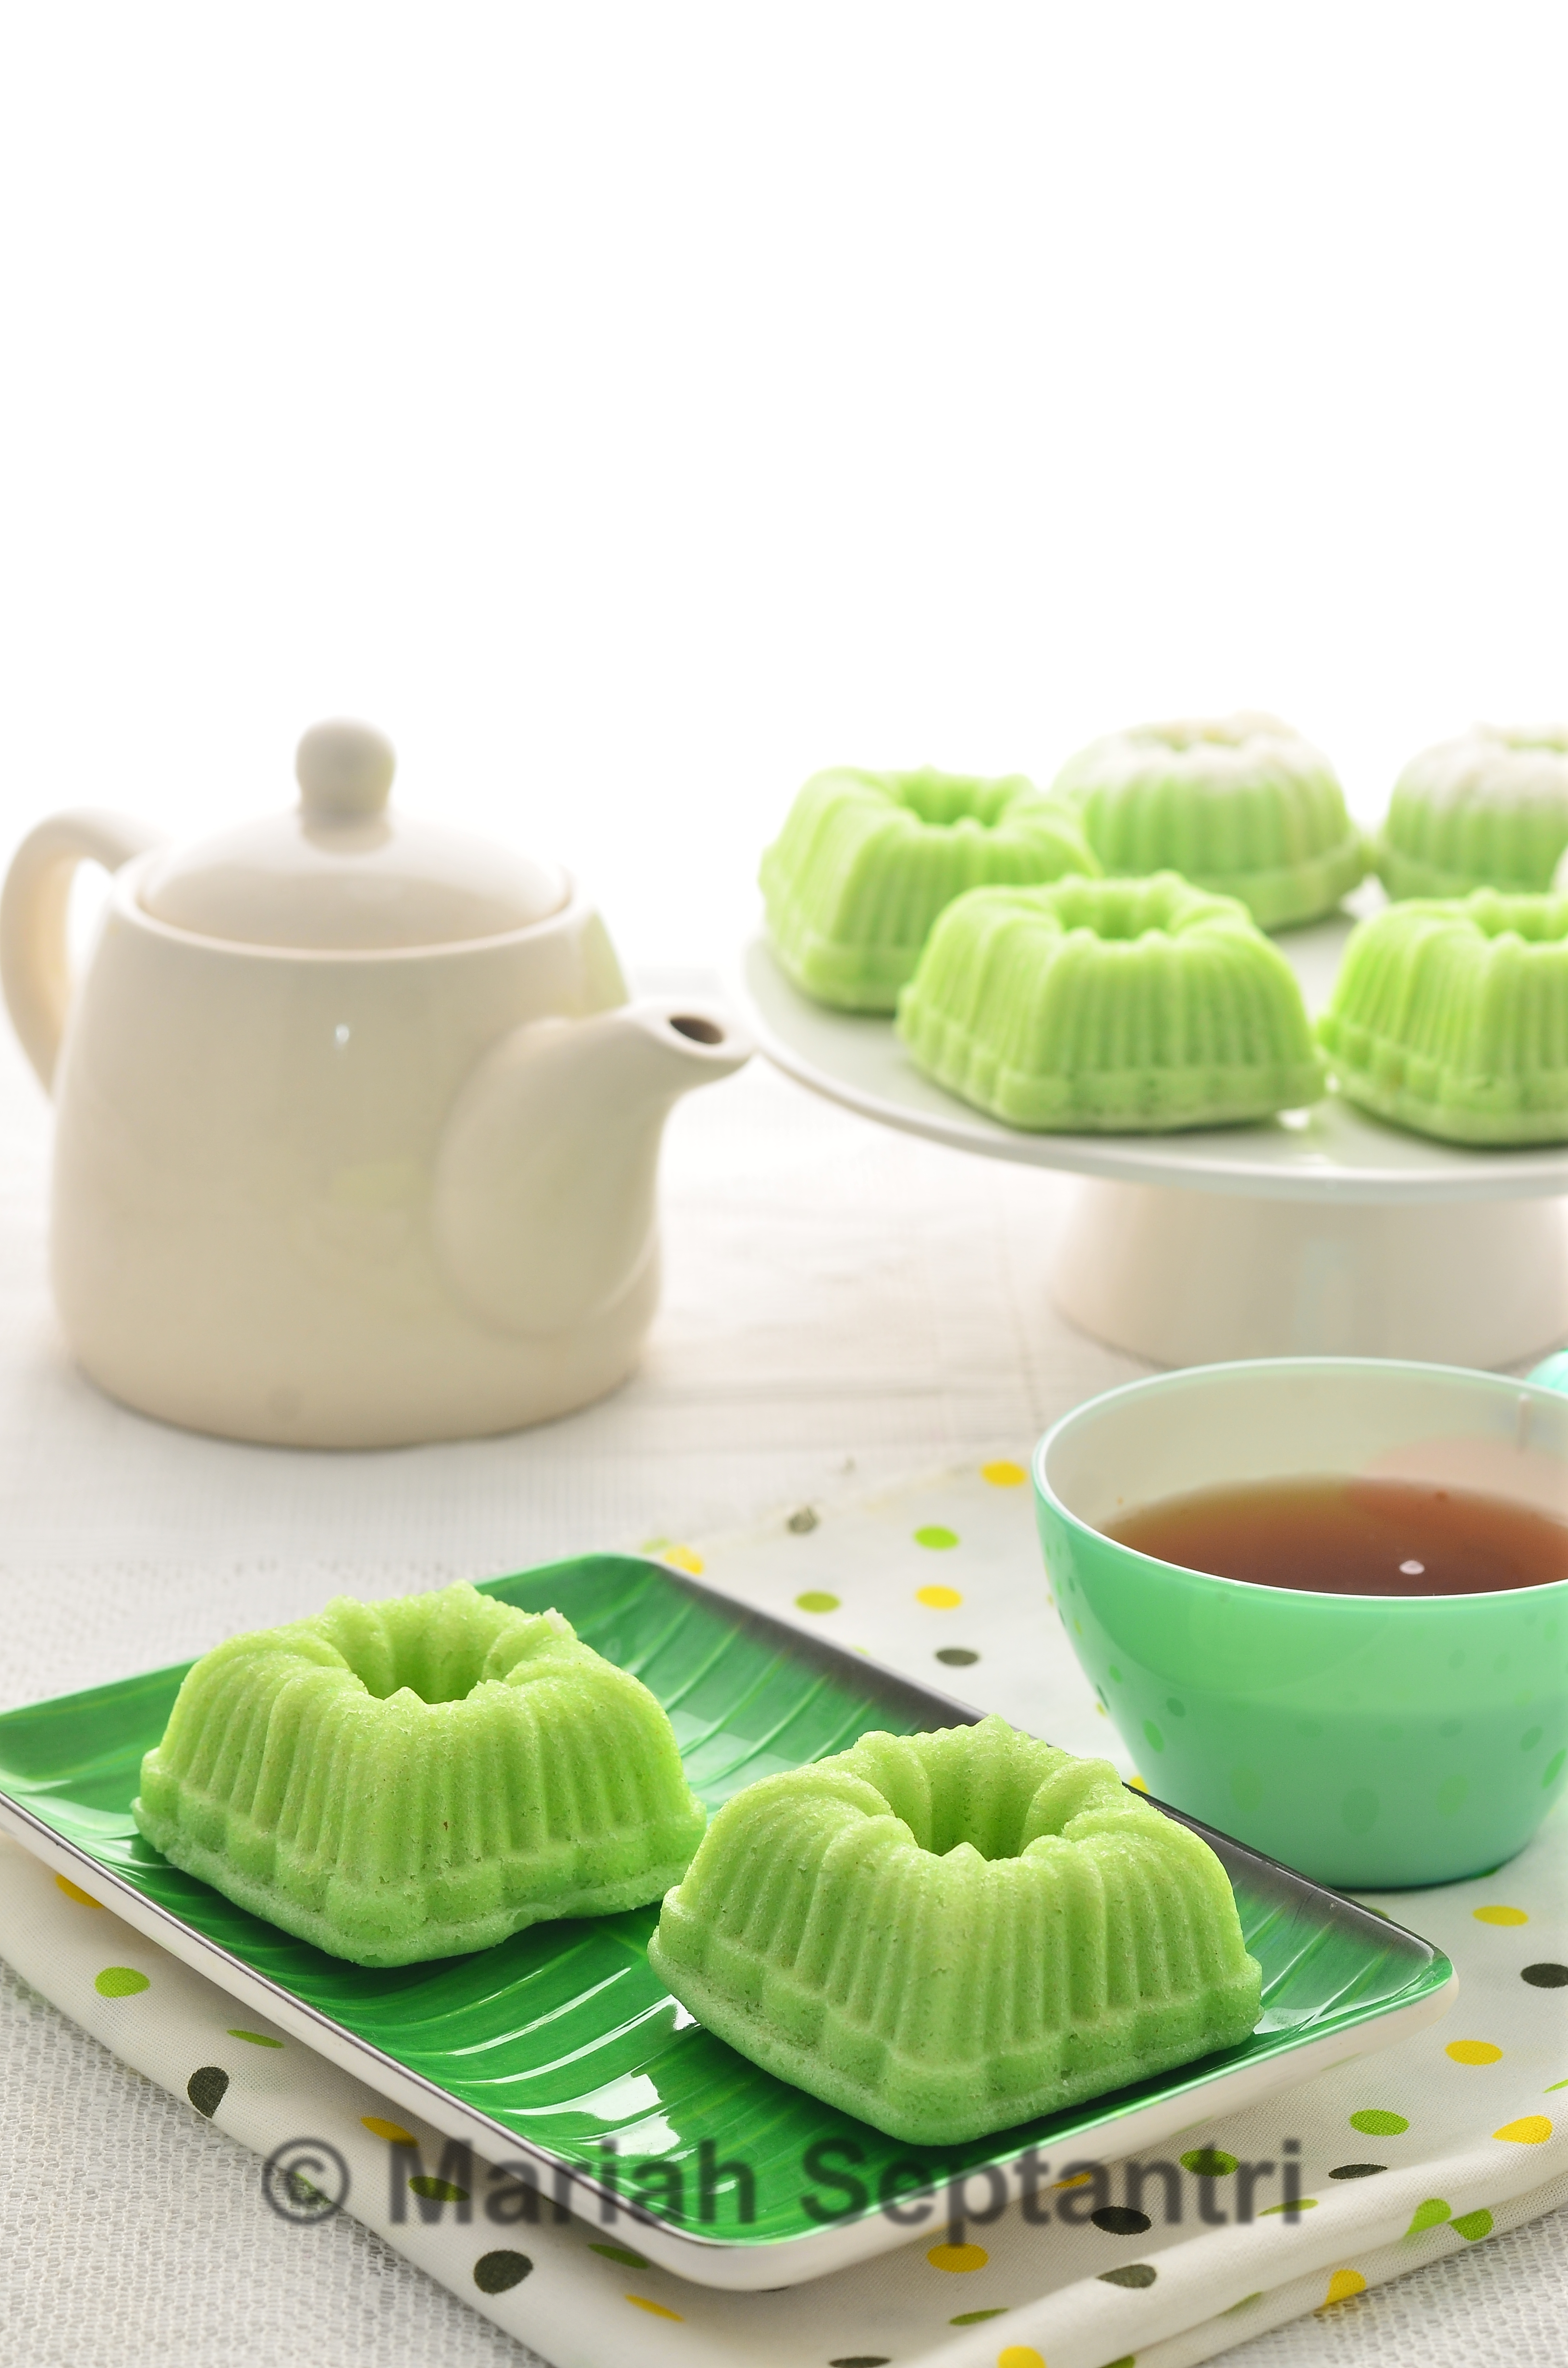
Youhou… emak masak-masak lagi nih. Karena sering liat postingan martabak manis yang mini di sosial media bikin emak penasaran sama bentuknya yang kiyut en imut. Mumpung ada cetakannya (yang khusus dibeli pas mudik ke Jakarta), mainlah si emak ke dapur yang sebelumnya repot browsing resep yang jitu di internet. Untungnya banyak resep-resep yang di Youtube.

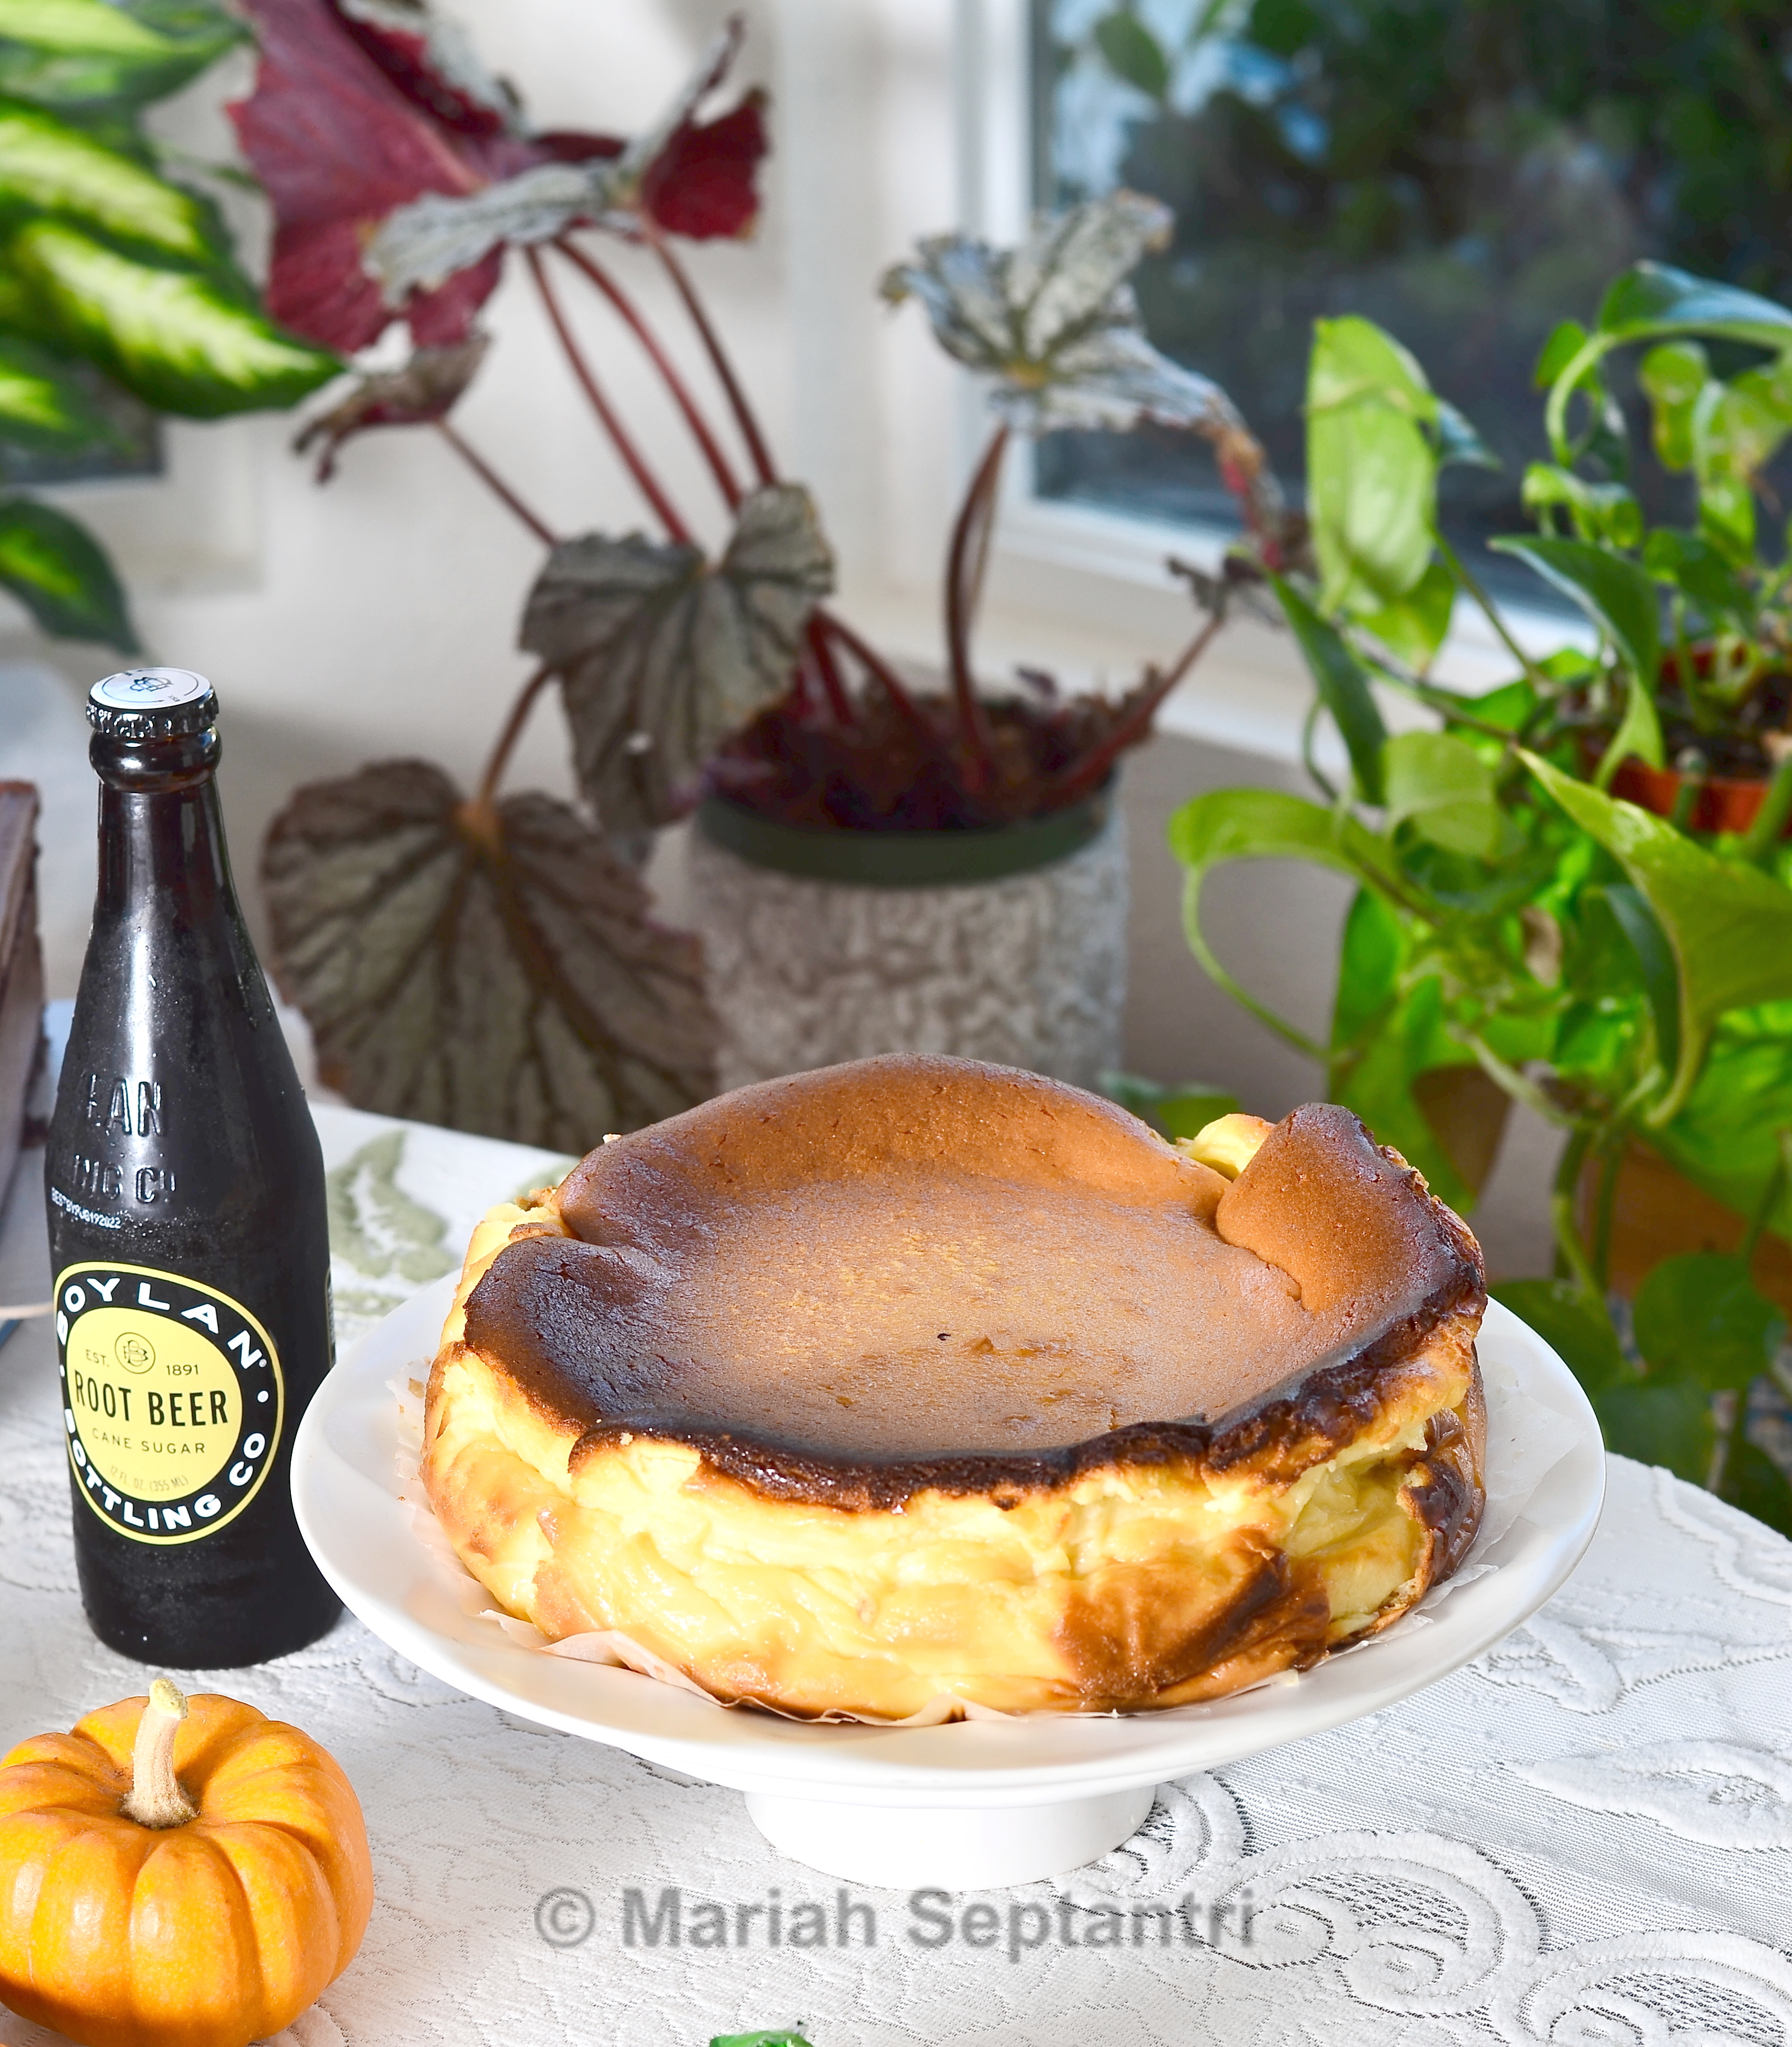
Resep yang ini gak pake ragi instan melainkan soda kue, martabak ini lembut sampai 2 hari (disimpan di wadah plastik yang kedap udara di suhu ruangan). Awalnya sempet khawatir kalau gak bakalan sukses ternyata setelah liat tips yang lain di Youtube maka jadilah seperti foto diatas dan seperti yang dijual abang-abang yang jualan.

Tips yang harus diikuti sebagai berikut :

  • Gunakan iron cast pan (jadi cetakan yang bahannya tebal)
  • Olesi wajan/cetakan dengan margarin. Wajan harus dalam keadaan panas sebelum adonan dituang, dan kecilkan panas kompor sebelum  adonan dituang supaya adonan bisa berpori/bersarang dan  bagian bawah tidak gosong
  • Taburi gula setelah pori-pori muncul karena jika sebelumnya maka pori-pori tidak muncul dan tidak bisa bersarang
  • Olesi dengan margarin/mentega segera setelah diangkat supaya bisa meresap dan ada rasa gurih. Saya suka olesi agak banyak.
  • Setelah adonan dituang, adonan ditekan dengan sendok sayur agak bisa ada pinggiran (bisa diliat di video cara bikinnya)


DSC_3785

Bahan-bahan  ( untuk 12-15 martabak mini)

  • 150 gr tepung protein sedang (saya pakai cake flour)
  • 5 sdm tepung tapioka
  • 2 sdm margarin (lelehkan)
  • 200 ml air
  • 1 telur
  • 27 gr susu bubuk
  • 1/2 sdt baking powder
  • 1/4 sdt garam
  • 3 sdm gula pasir
  • 1/2 sdt baking soda
  • Gula pasir secukupnya untuk taburan


Bahan-bahan untuk topping
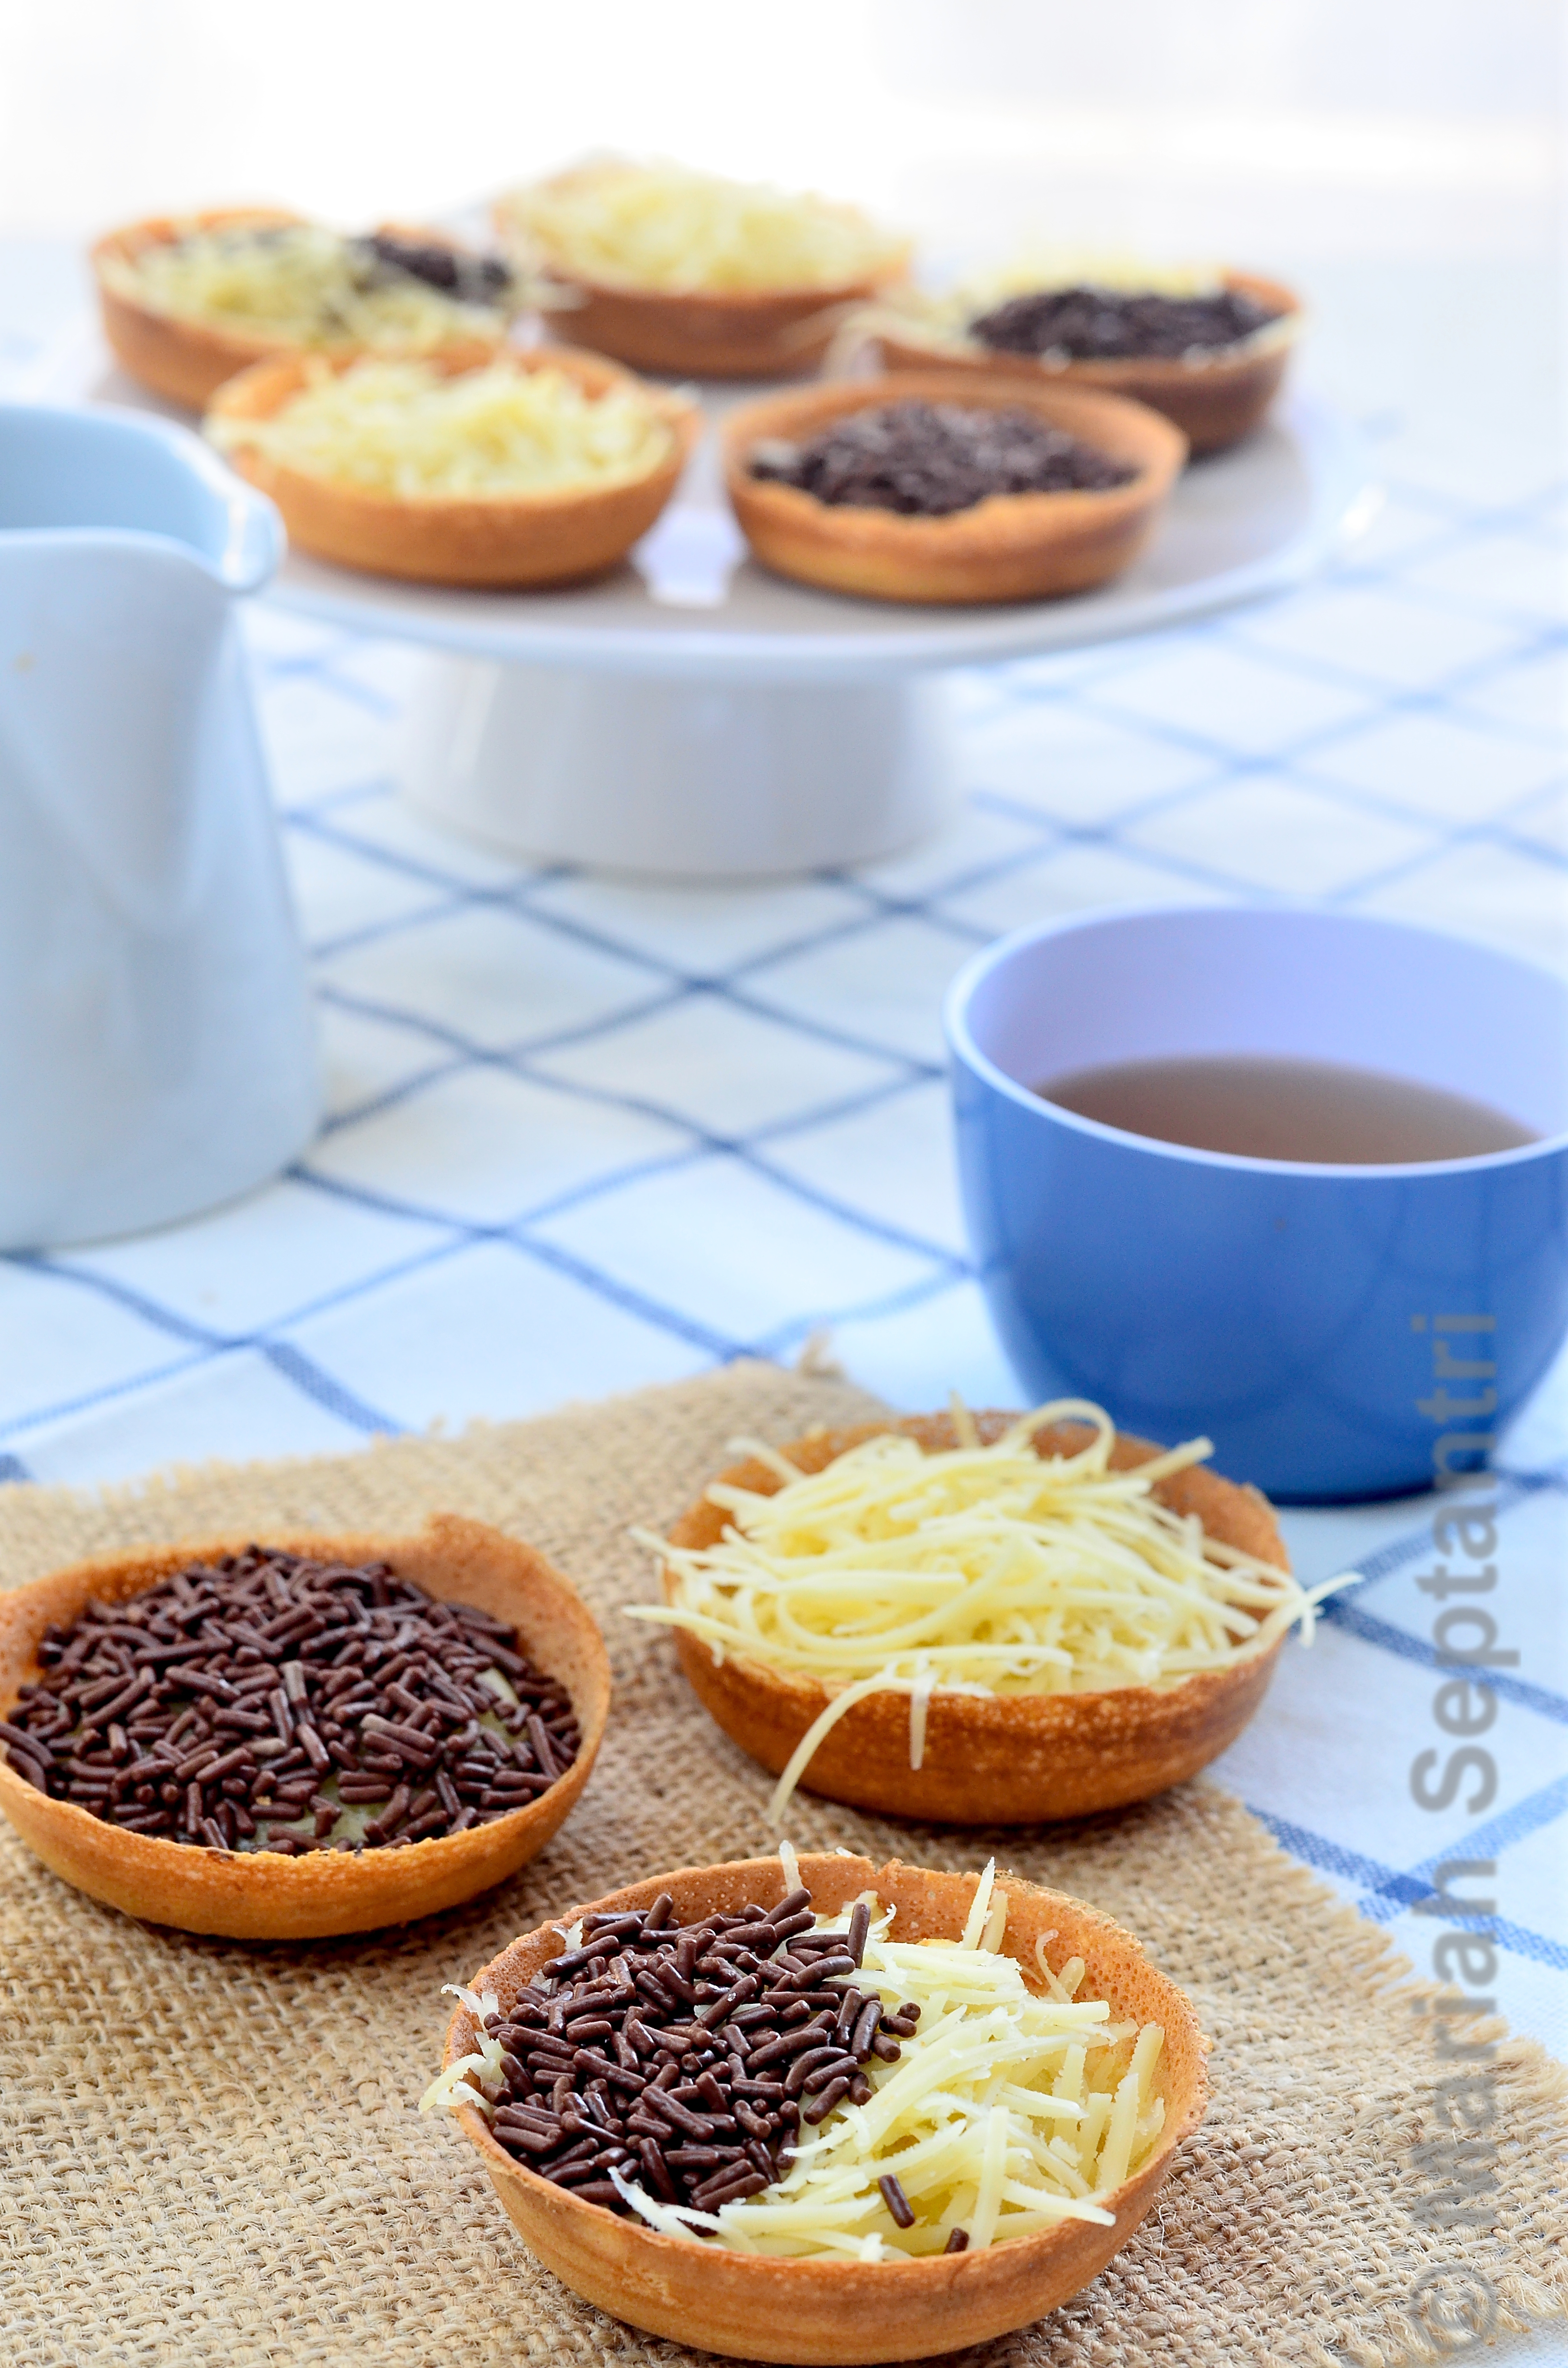
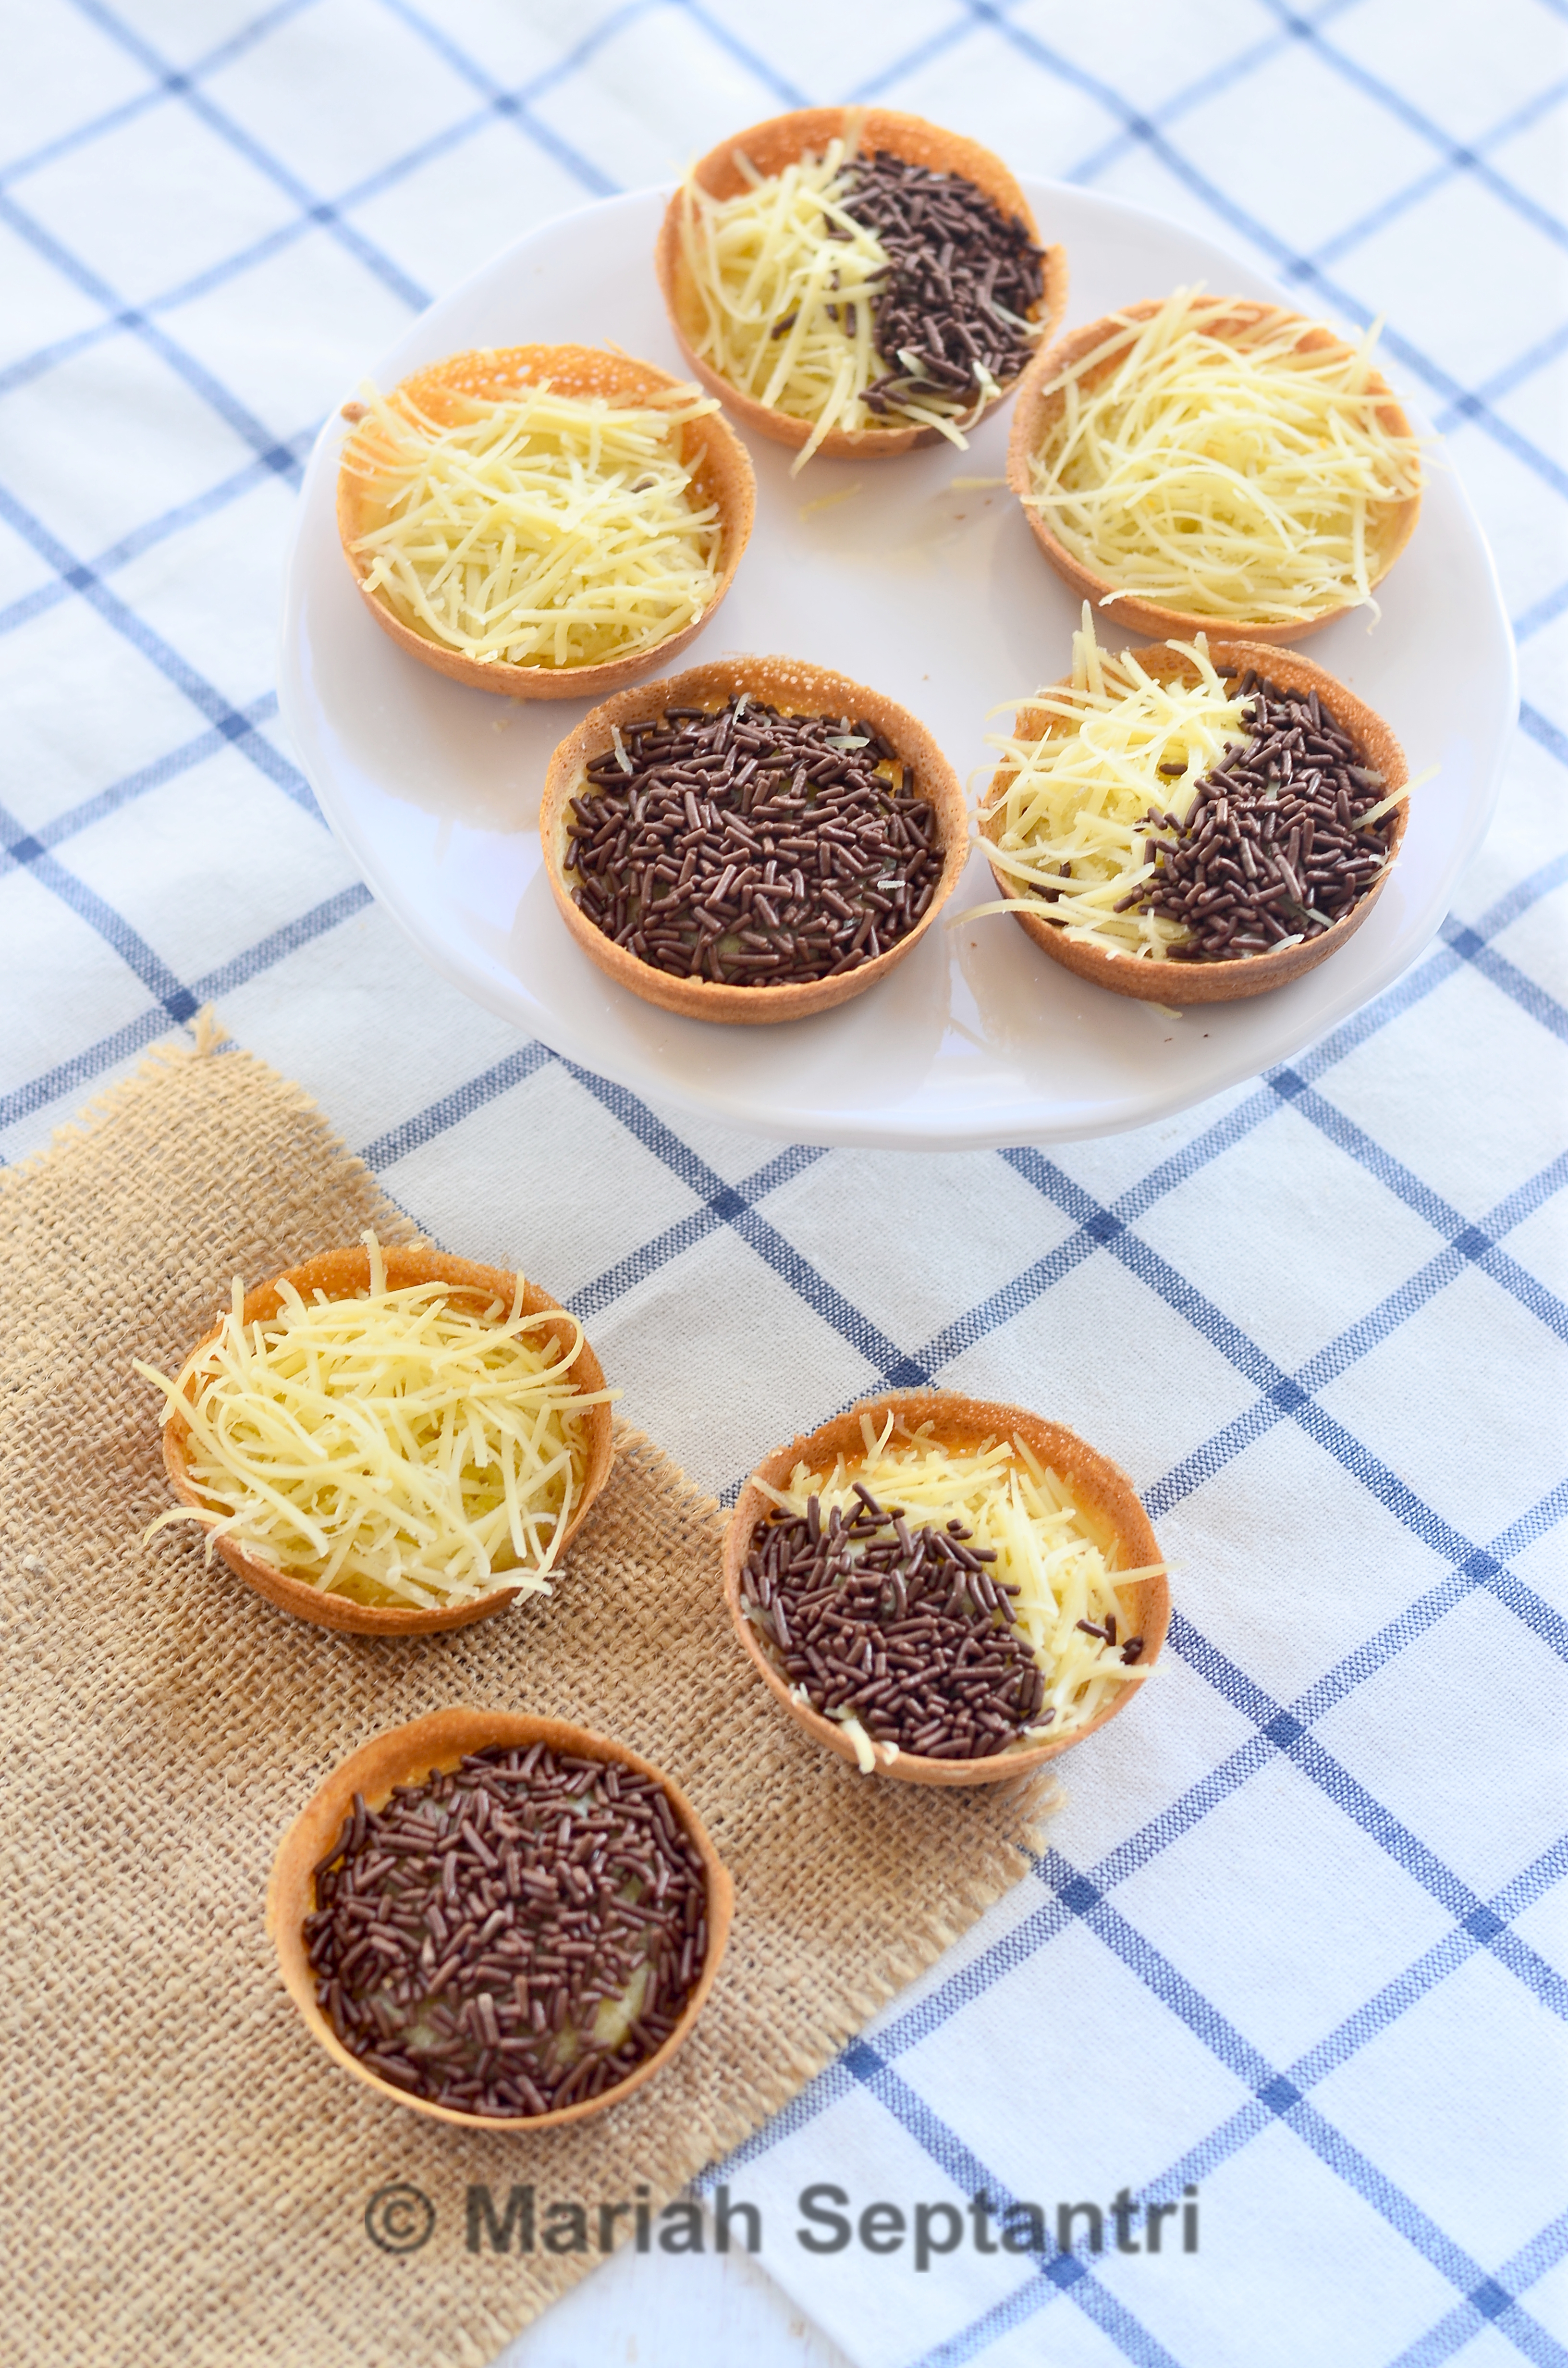
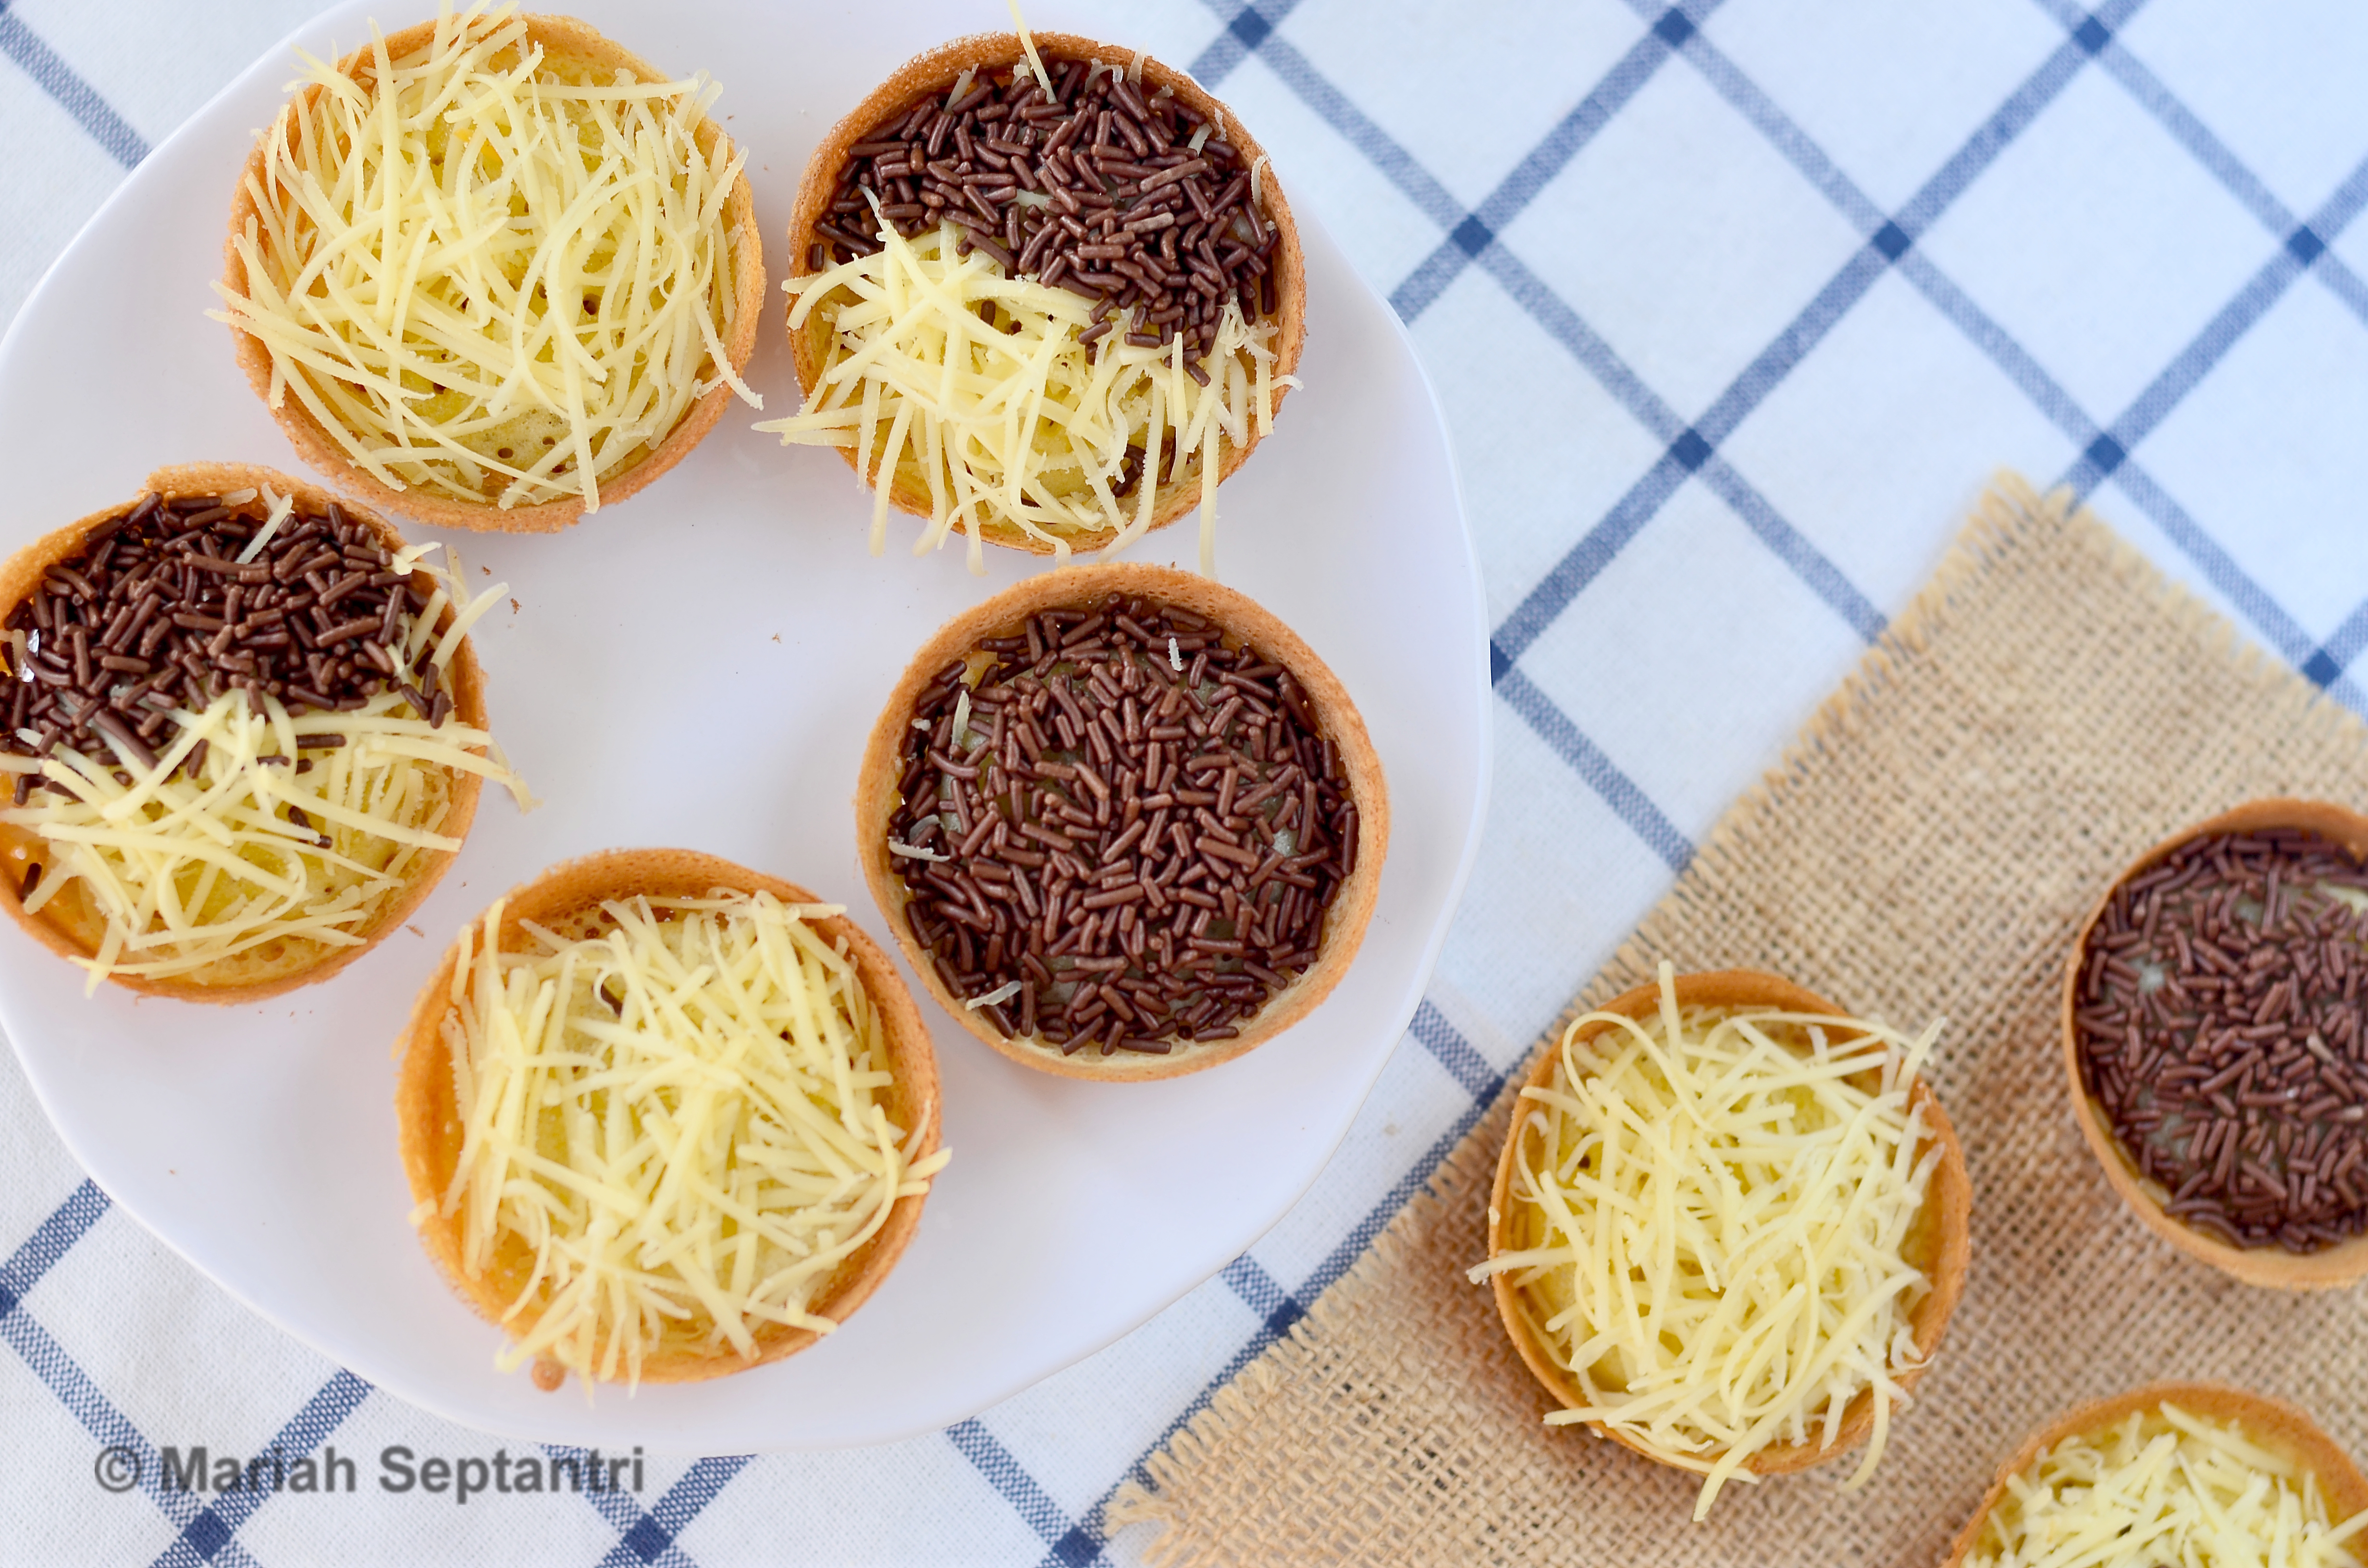
  • Keju cheddar parut
  • Meises coklat
  • Susu kental manis


Cara membuat :

  1. Campurkan tepung terigu, tapioka, gula pasir, susu bubuk di dalam wadah plastik. Aduk dengan whisker
  2. Tuang air, sedikit demi sedikit sampai adonan tercampur merata
  3. Tuang margarin yang sudah dilelehkan
  4. Masukkan baking powder dan garam, aduk sampai tercampur merata
  5. Diamkan selama 1 jam (tutup dengan  kain)
  6. Setelah 1 jam masukkan soda kue/baking soda dengan sedikit air
  7. Olesi cetakan dengan butter. Panaskan wajan/cetakan sampai benar-benar panas dan kecilkan kemudian tuang adonan
  8. Ketika menuang adonan, adonan ditekan dengan sendok sayur agar bisa ada pinggirannya, tutup wajan/cetakan
  9. Setelah muncul pori-pori atau gelembung-gelembung maka taburi dengan sedikit gula pasir dan tutup kembali
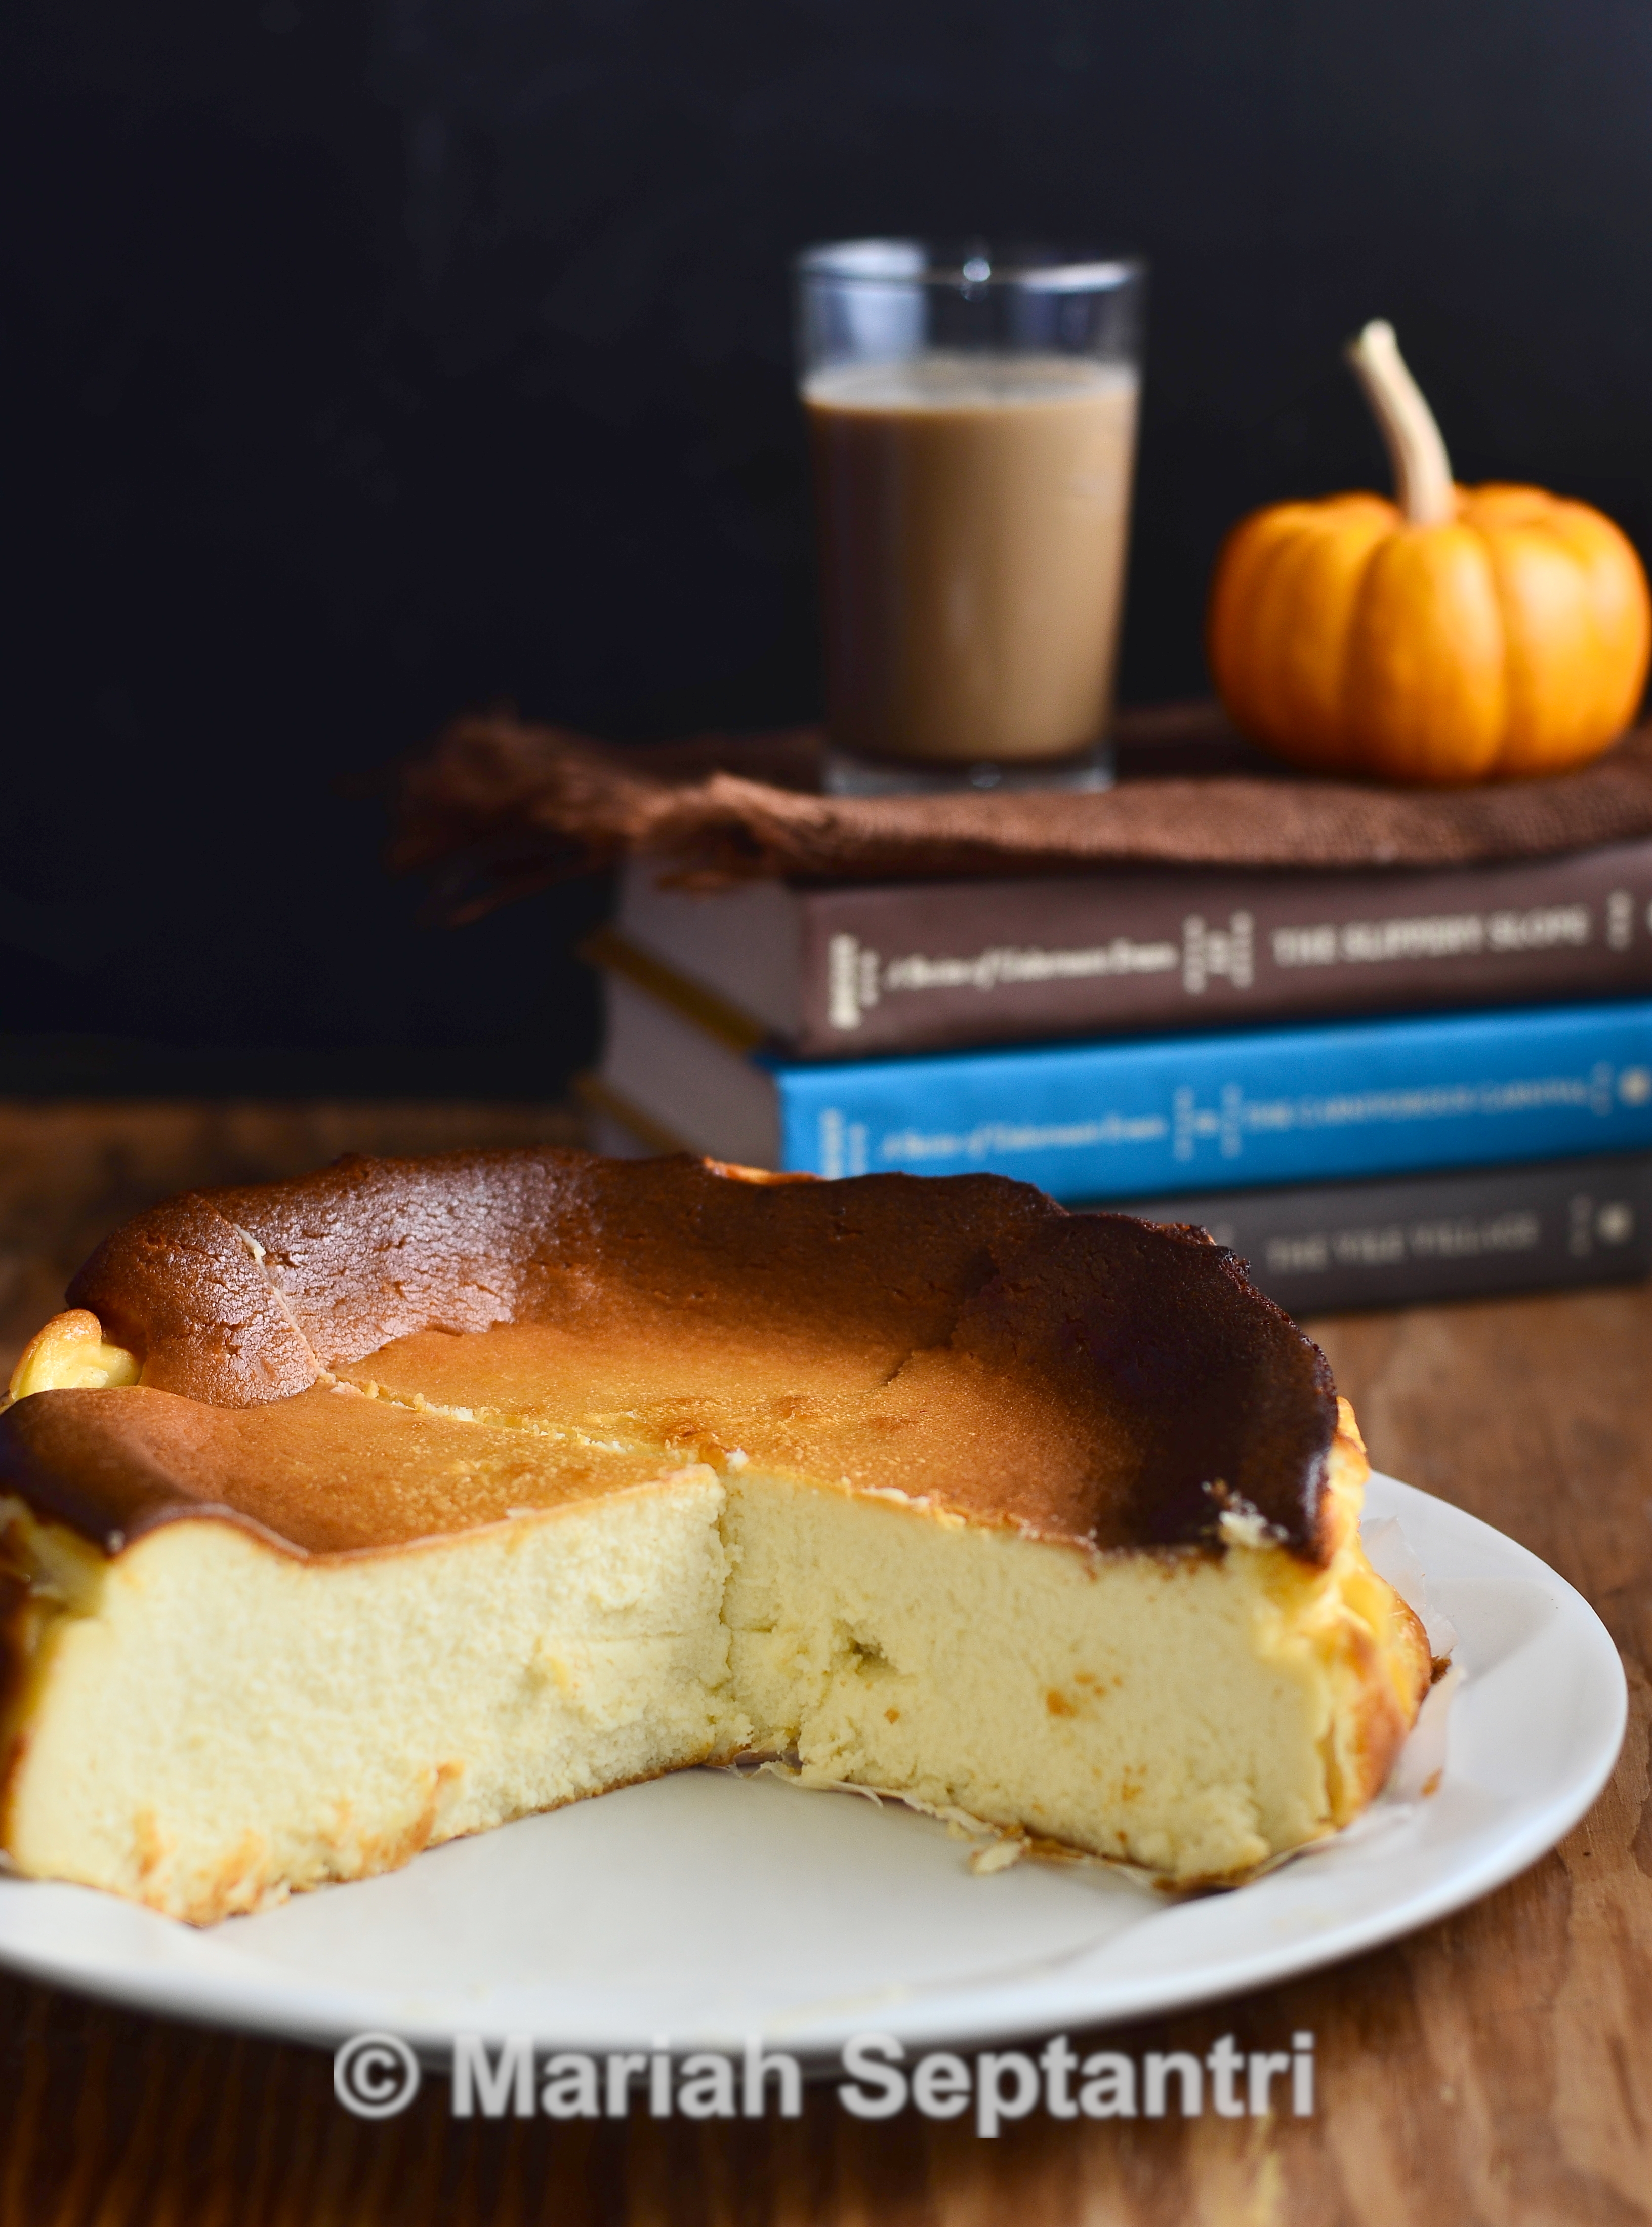
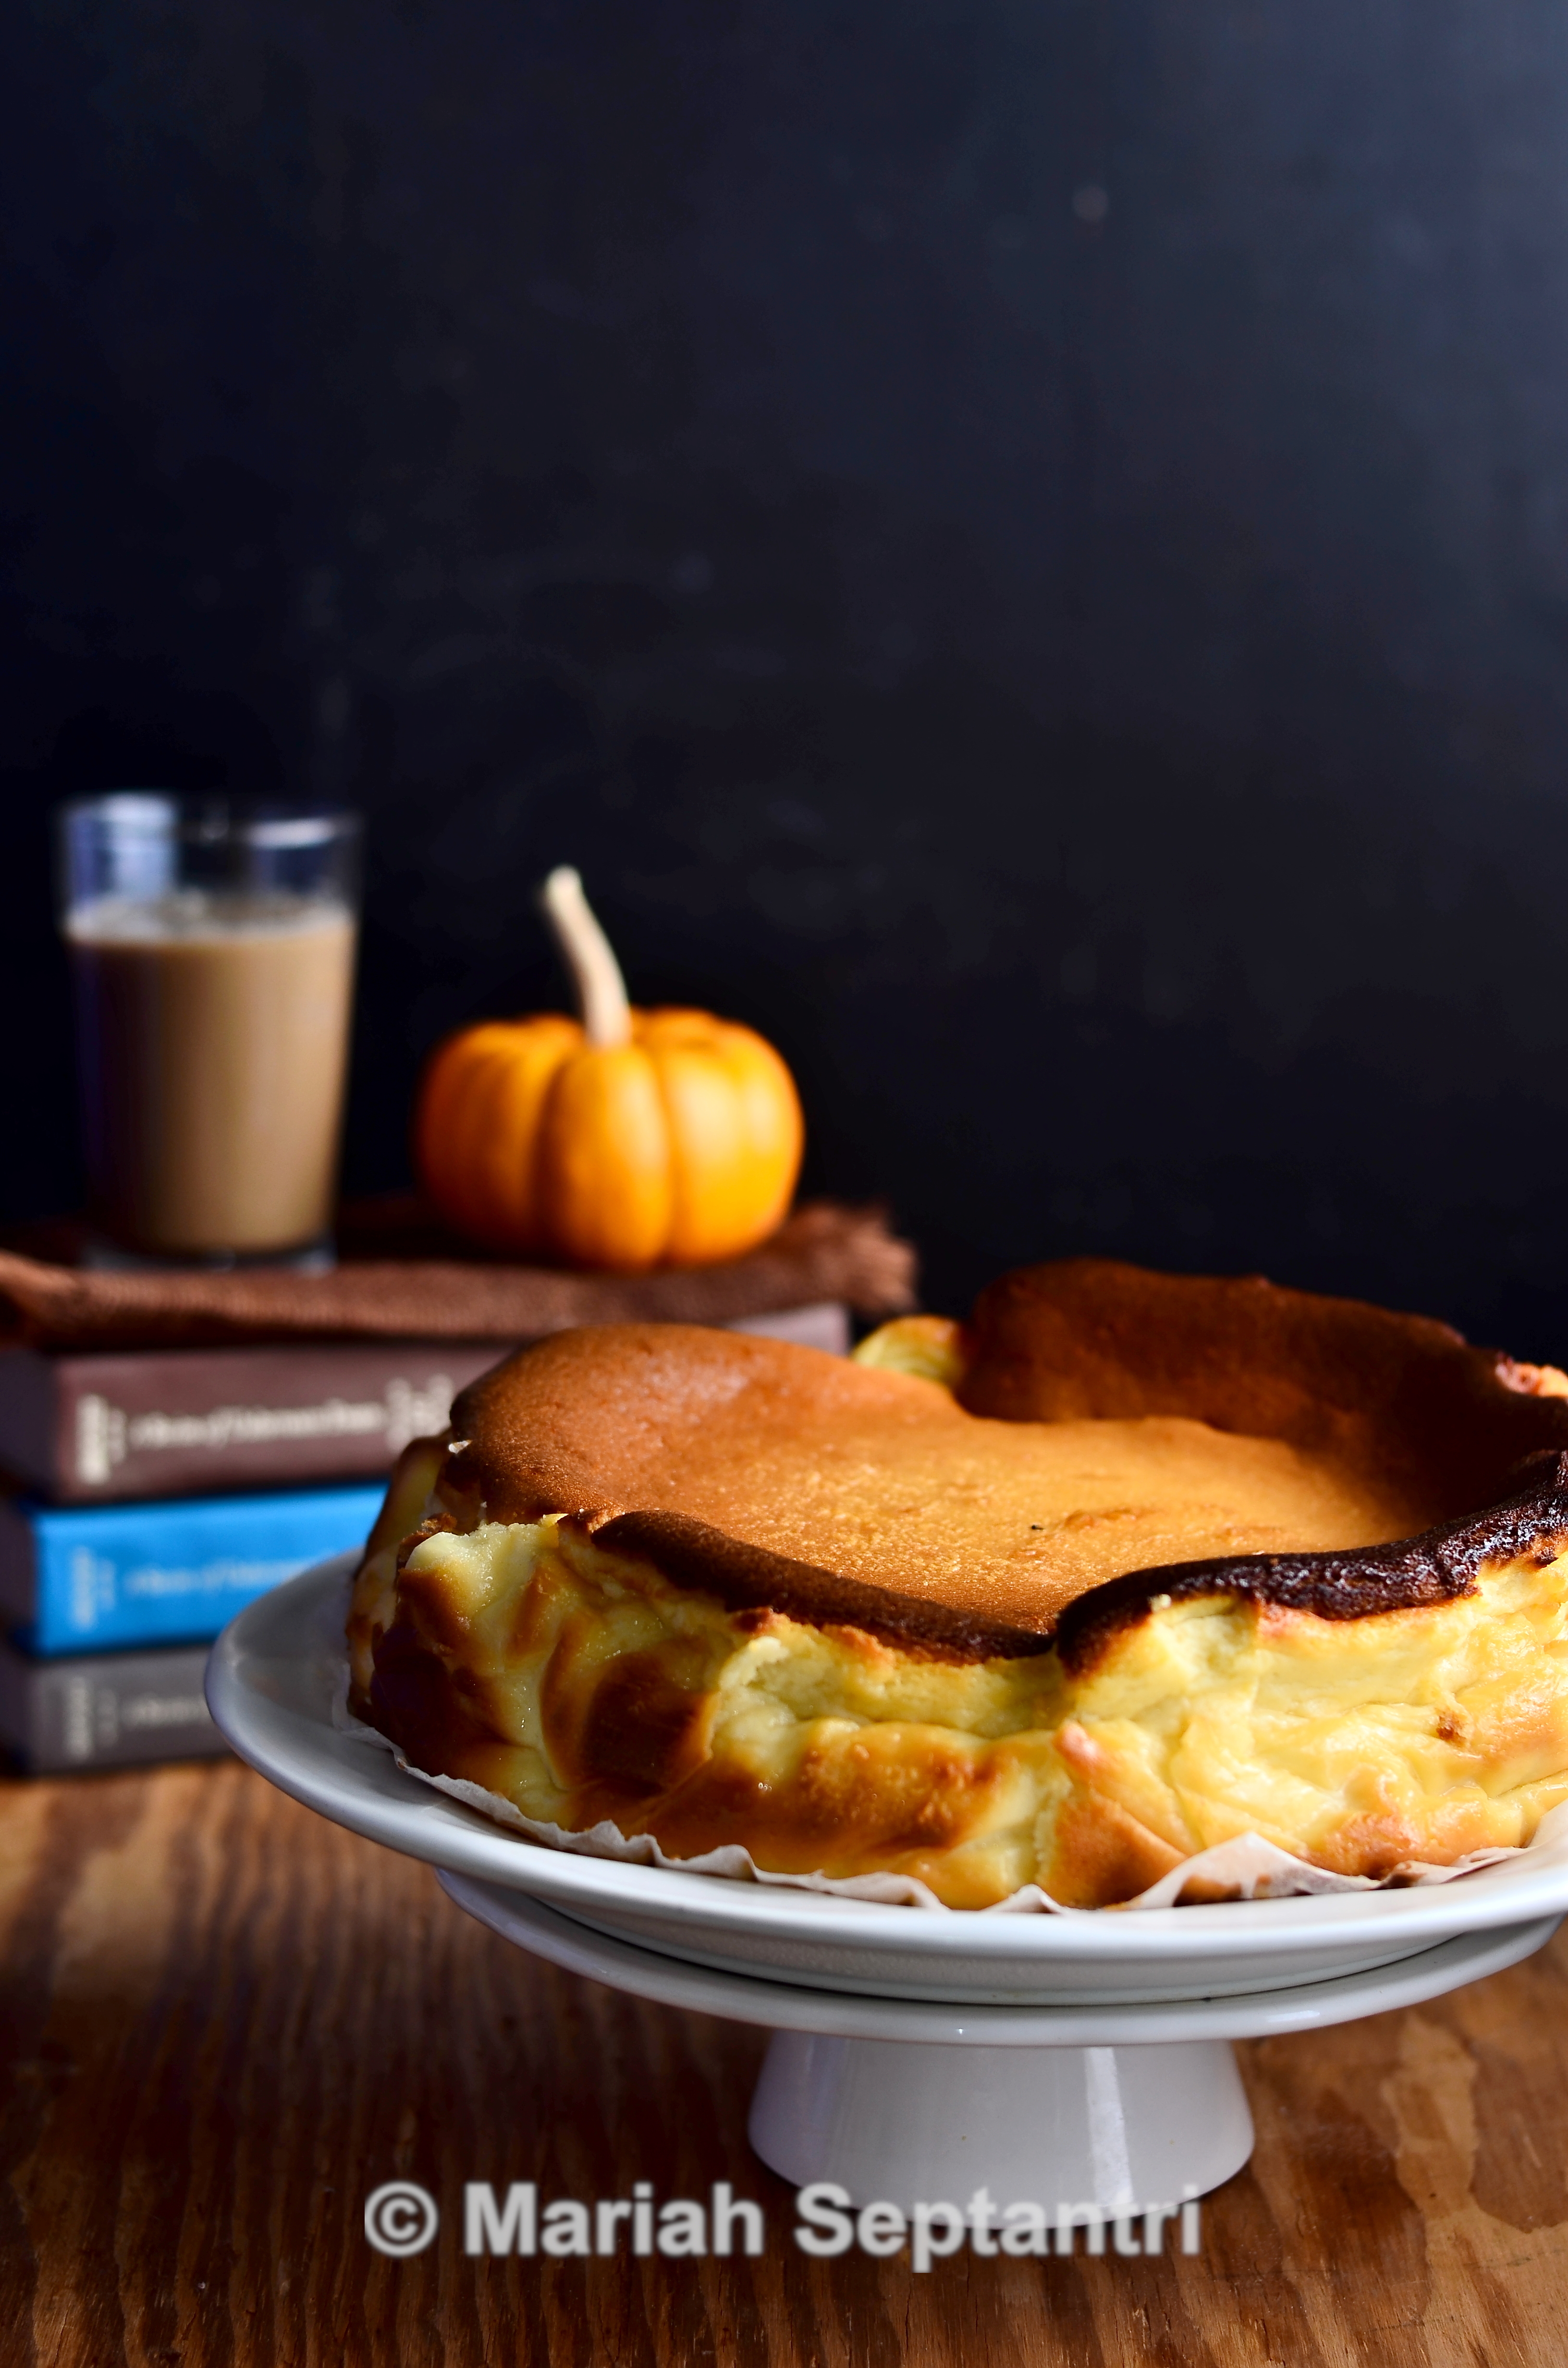
  10. Angkat ketika pinggiran sudah berwarna kecoklatan dan langsung olesi bagian dalam dengan margarin.
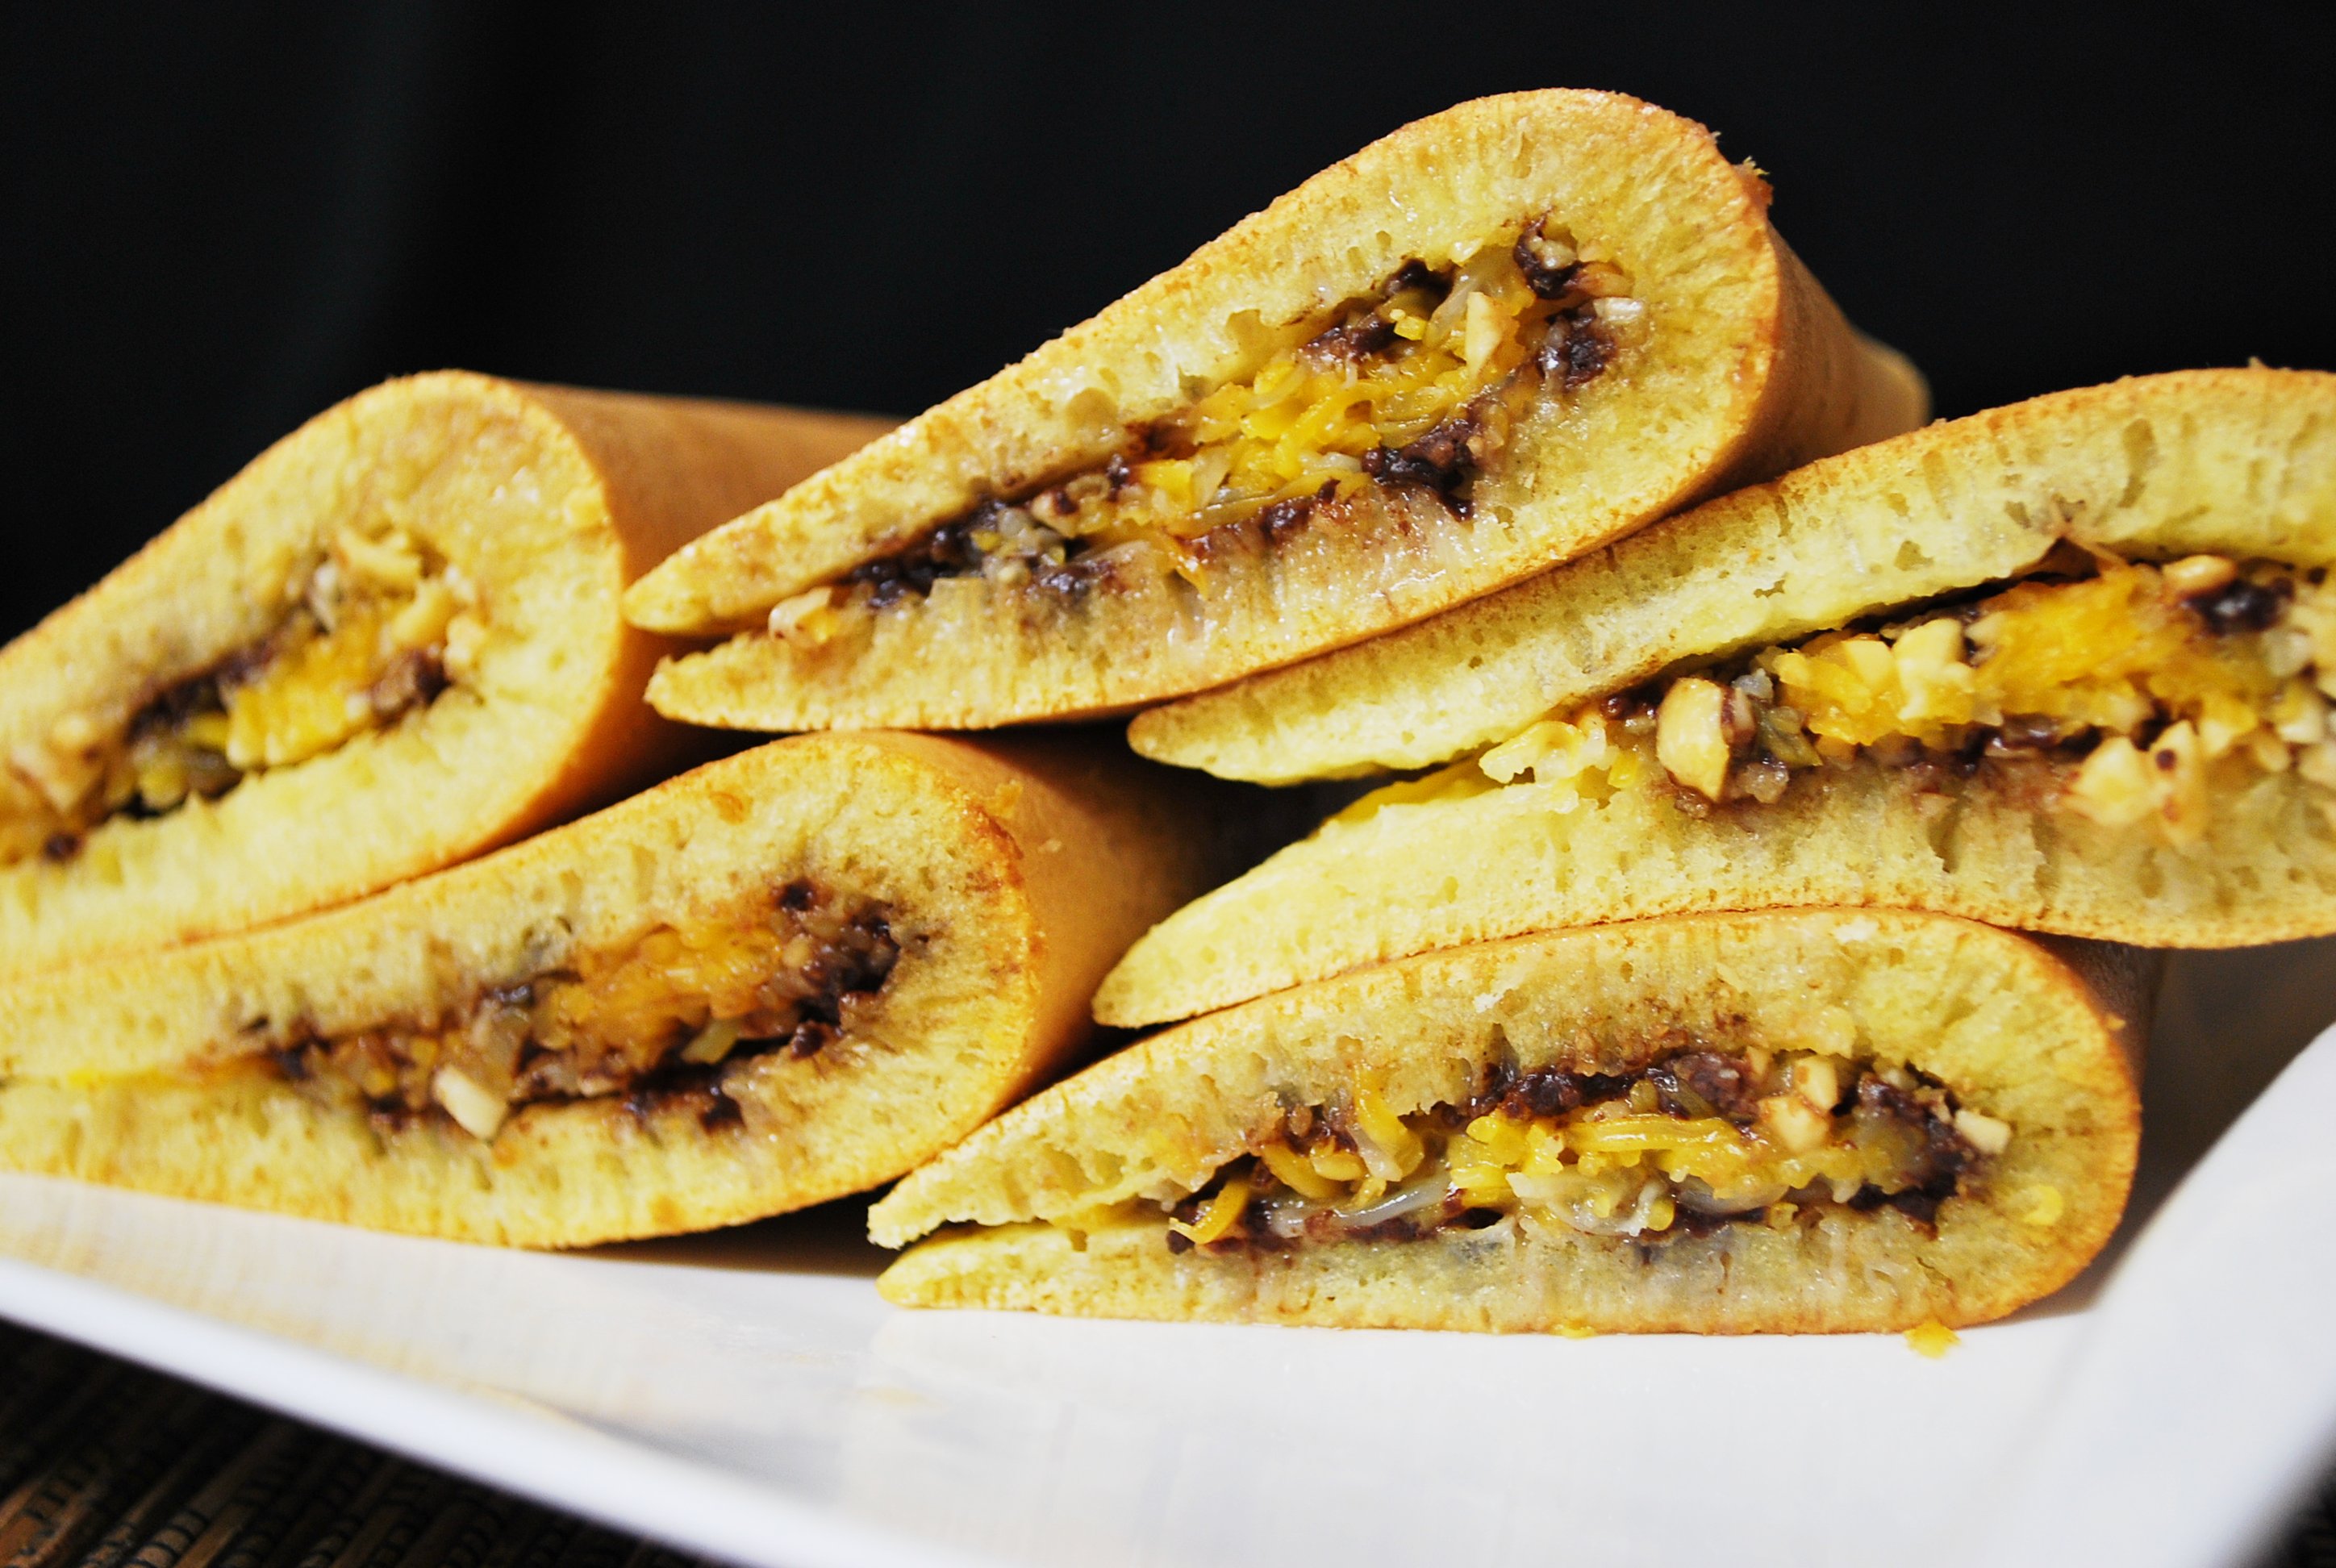
  11. Martabak bisa diberi topping yaitu : keju parut, coklat meises atau kacang yang dicincang kasar. Tambahkan susu kental manis jika suka


DSC_3789


Hello !

This time I want to introduce Indonesian Pancake, this glorious dessert (if you can see from the picture ; the topping that we usually add to this pancake) easily found on the hawker people (street vendor). The size of this snack is usually made as big as the medium cast iron pan then is folded and cut it to square-ish size. Since I have cast iron for mini pancake so I want to go easy on munching this dessert.

You can just use the medium cast iron then fold into two. I made this kind of pancake years ago using the medium cast iron

CSC_1273

I will share this recipe, this sweet delectable is quite addictive for me though I know it’s better to control my food intake. I hope you will try and like this recipe


Ingredients :

  • 150 gr  cake flour
  • 5 tbsp tapioca starch
  • 2 tbsp margarin/butter (melted)
  • 200 ml water
  • 1 egg
  • 27 gr powder milk
  • 1/2 tsp baking powder
  • 1/4 tsp salt
  • 3 tbsp granulated sugar
  • 1/2 tsp  baking soda
  • 1 – 2 tbsp sugar for sprinkle


Topping/filling :

  • Chocolate sprinkle
  • Grated Cheddar cheese ( I prefer organic one)
  • Sweet condensed milk
  • Peanuts; rough chopped


Method :

  1. Combine cake flour, tapioca, sugar and milk powder in medium plastic bowl. Sift with whisker.
  2. Pour water slowly while mixing the mixture
  3. Add melted margarin/butter.
  4. Add baking powder and salt, mix until well blended
  5. Let rest for 1 hour (cover with plastic wrap)
  6. After 1 hour resting, add baking soda dilute with 1 tsp of water
  7. Heat the cast iron pan, grease it with butter. When it’s hot enough, turn down the heat (use low heat). Pour the pancake mixture to the pan
  8. If you have cast iron mold (mini) when you pour the pancake mixture smear the side of the pan with the pancake mixture until it forms the mound. Close the lid
  9. Wait until the bubbles appear, sprinkle with little sugar and close the lid
  10. When you see the side is golden brown (but not burnt) , take out from the pan, brush it the inside with butter. If you are using medium cast iron pan then brush also the bottom pancake or the brown part. Add the grated cheese, chopped rough peanut and chocolate sprinkle . Add condensed milk if you like and fold into two. Cut into square-ish. If you are using mini pan like below, just brush the inside of pancake with butter and use the preferable topping.


20180926_165526


Posted in Dessert, gluten free, Indonesian Food

Katiri Mandi Ubi Ungu (Glutinous ball with coconut milk sauce)


DSC_0027


Sebenarnya ini saya buat pas bulan puasa tapi sengaja posting sekarang karena gak tega posting makanan pas puasa karena takut tergiur, halah….

Kalau familiar dengan biji salak, teksturnya sama cuma ini dari ubi ungu. Nemu ubi ungu yg beku di Ranch Market, emak langsung beli walau pas sampai rumah sempet mikir mau bikin apa dengan ubi ungu. Masih ada sisa setelah bikin katiri trus bikin klepon ungu. Di resep aslinya penampilannya cantik bener, emak gagal bikin bulat-bulat yang ujungnya lancip maka jadilah seperti foto diatas. Trus kuah santannya agak kental karena krucil saya senangnya agak kental. kalau di resep aslinya gak terlalu kental.

Kalau yang penasaran sama cemilan ini, silahkan dicoba ya. Saya biasanya cuma bikin setengah dari resep.

Bahan-bahan :

Bola-bola: 

  • 150 gr tepung ketan putih
  • 100 gr ubi ungu yg sudah dikukus dan haluskan (saya pakai yg kemasan ubi ungu yg beku)
  • Sedikit garam
  • 125 ml air


Kuah Santan:

  • 750 ml santan (saya pakai merk KARA, perbandingannya kurang lebih 500 ml + 250 air)
  • 2 sdm tepung beras (larutkan dengan sedikit santan)
  • 150 gr gula pasir
  • 2 lembar daun pandan (saya tidak pakai)
  • Sedikit garam


Cara membuat :

  1. Campurkan tepung ketan dengan garam, sisihkan. Ubi ungu yang sudah dikukus dan dihaluskan dicampurkan dengan tepung ketan. Uleni dengan tangan.
  2. Tambah air sedikit demi sedikit sampai adonan kalis dan bisa dibuat bola-bola
  3. Habiskan adonan dengan dibuat bola-bola
  4. Masak santan, tepung beras, garam dan gula sampai  mendidih
  5. Rebus air sampai mendidih, masukkan bola-bola ungu sampai terapung. Tirisnkan dan masukkan ke kuah santan, masak sampai mendidih dan angkat dari api.


DSC_1572 Continue reading “Katiri Mandi Ubi Ungu (Glutinous ball with coconut milk sauce)”